:: Diary - November 2009 ::
:: Sunday, November 1, 2009 ::
It's the local monthly club meeting again, it's absolutely pishing down rain, and I have a choice of two TVRs to take. After much deliberation I decide on
the Cerbera - I haven't had it along for ages.
I meet up with another couple of TVRs plus Dave and Jim in a "normal" car - Dave's S is garaged for the winter and the wedge needs a distributor repair.
Jim's car has apparently converted itself into an outdoor swimming pool.
We set off, and I end up driving like Miss Daisy - the roads are soaking and every time I hit standing water the car almost turns sideways. This is the
first time I've ever left skid marks while driving on a wet road - and none of the marks are on the road. Still, we get there, to discover that anybody
with any sense has left their TVRs at home. There are about 8 nutters in TVRs on the day.
When we come to leave, I notice a group giving Hugh's S a push, but it won't start - it's as dead as a dodo's grandad. To save any fiddling around, we
establish that there's no ignition light, no wipers, no indicators, no radio - but the lights and horn work. Now where have we heard this before kiddies?
August 2003 when the infamous yellow connector in the ignition switch burnt out and left me stranded on a roundabout. So I confidently state "yellow
connector" and he fiddles with it - and it works!
I guess that if you're going to break down, the place to do it is in front of 4 other owners of the same model of car, eh? Apart from the inevitable
subsequent piss-taking, that is...
:: Saturday, November 7, 2009 ::
Today the Sporting Bears are presenting 3 cheques to charities, and I've promised to take the Cerb along. Except it doesn't start. The same happened last
Sunday (although I didn't mention it) but connecting up my booster pack fires it into life. It's a big high-compression engine, and it needs all of the
battery power to crank it up to starting speed. It really doesn't take much, just a fraction of a volt drop, and it won't start.
Anyway, once we get under way, it's fine. We drive through the perils of Edinburgh traffic and countless sets of bloody roadworks, and the car behaves
fine, no sign of overheating. The car seems to go down well with the charity reps.
After a hearty lunch I head back home, again with no problems. I'm starting to get strange feelings which I look up in a medical encyclopaedia. Apparently
it's called optimism. There's a variety called "misplaced" but I hope it isn't that, but only time will tell.
:: Sunday, November 8, 2009 ::
I bought another car yesterday (a Fiesta for miss git who passed her test a couple of weeks ago) so my drive is almost full. I decide to take the S out
of the garage and take it along to the farm, and put the Cerb in the garage so that I can fix the driveshaft gaiters, and fit the new brake disks and
shock absorbers. Again the Cerb doesn't start when I go to move it - almost, but not quite, so the booster pack is called into service again.
The S, of course, starts first time, although it hasn't been running since the TVR club meeting at the start of October. It takes me 2 hours to take
the S 4 miles to the farm, and somehow the speedo does about 50 miles in that time. Maybe I went a slightly longer route, because I was enjoying it.
Fantastic wee car...
:: Wednesday, November 11, 2009 ::
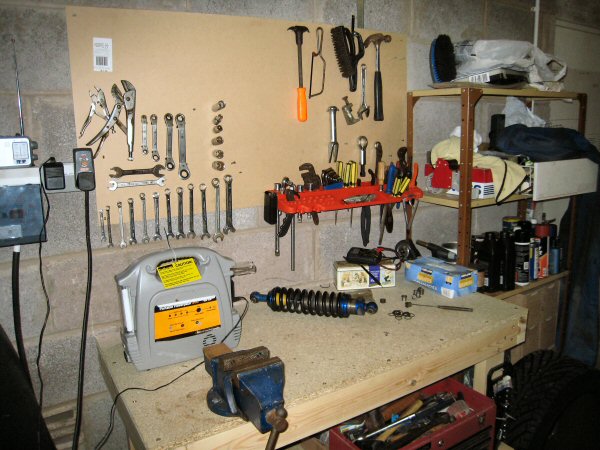
Well, it's now nearly 3 months since I moved house, to get a shiny new garage. So far, I've cleared it out, shifted all my stuff. put up shelves and
hooks, installed strip lighting in place of the faded bulbs, and of course mutilated myself while building a nice sturdy workbench-cum-operating table.
 Here's the workbench now that it's finished, with storage for the more regularly used tools, and a handy storage compartment for the Elastoplast.
One thing I haven't actually done in the garage yet, is any car-fixing... So tonight I decide it's time for some ferapeutical fixing fun.
I decide that I'll have a go at the Cerb's rear suspension - it needs the drive shaft gaiters replaced, and I'll also change the rear shock absorbers.
First job is to jack the car up and take the wheels off - excpet the jack doesn't fit under the car so I have to put the back wheels up on to a couple
of planks of wood so I can get the jack under. Jack up the diff, put axle stands under the chassis, then take the wheels off. So far so good.
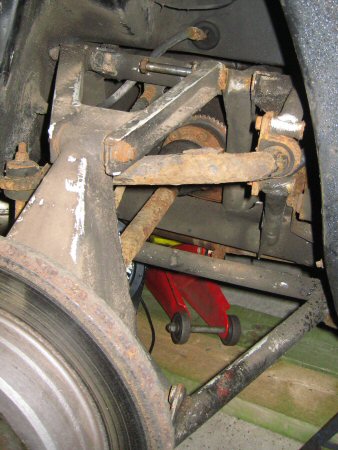
 The offside shock absorber next, to give me room to get to the diff bolts. The two shocker bolts come off pretty easily - the top one also holds the
front of the wishbone in place so I don't take it all the way out.
The offside shock absorber next, to give me room to get to the diff bolts. The two shocker bolts come off pretty easily - the top one also holds the
front of the wishbone in place so I don't take it all the way out.
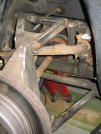 Take out the bottom bolt, but the shocker is still held in place by the suspension. I have to get a spare bit of 4 by 2, and lever the bottom wishbone
down to get the shocker out. I knew that spare bit of wood would be useful!
Take out the bottom bolt, but the shocker is still held in place by the suspension. I have to get a spare bit of 4 by 2, and lever the bottom wishbone
down to get the shocker out. I knew that spare bit of wood would be useful!
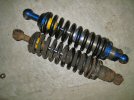 At this point I notice that the new shock absorber is about an inch shorter than the one I've just taken off, so I'll probably have to adjust the ride
height when I put the new ones on. I'll also have to set up the hardness of the dampers - at the moment I turn them to about half-way between soft and
hard. Should still be better than my old ones - at the moment the car's backside feels a bit floaty, especially compared to the S, which is like riding
a barrel of bricks down a coal bing.
At this point I notice that the new shock absorber is about an inch shorter than the one I've just taken off, so I'll probably have to adjust the ride
height when I put the new ones on. I'll also have to set up the hardness of the dampers - at the moment I turn them to about half-way between soft and
hard. Should still be better than my old ones - at the moment the car's backside feels a bit floaty, especially compared to the S, which is like riding
a barrel of bricks down a coal bing.
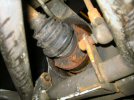 The drive shaft is held in place with 6 allen bolts on each end. The outer ones are full of crud so I pick all the muck out of the recesses with a wee
scriber, to get it as clean as I can so that the allen key will get a good grip. And it does - it grips really well - but as I try to loosen the first
bolt, it feels as if it is starting to round off the recessed socket so I stop. The next bolt feels the same. And the next.
The drive shaft is held in place with 6 allen bolts on each end. The outer ones are full of crud so I pick all the muck out of the recesses with a wee
scriber, to get it as clean as I can so that the allen key will get a good grip. And it does - it grips really well - but as I try to loosen the first
bolt, it feels as if it is starting to round off the recessed socket so I stop. The next bolt feels the same. And the next.
I don't want to force it and end up rounding the bloody things off - so I stop for a think. I could try hammering a torx driver in there - that might
grip. I could try those nut grippers I bought when I was doing the exhaust, they might work - but they might not fit if the rubber boot is in the way.
Whatever I do, it's probably a good idea to give the bolts a good whack just to shock free any rust bond. But the dinner's ready so I give up for now...
It looks like the driveshaft boot replacement is going to turn into right pain in the backside. I can't be bothered... But, in the words of Magnus
Magnusson, I've started so I'll finish. Unfortunately, my specialist subject isn't wielding a vast array of hammers at suspension components any more,
it's changed for the recent rounds, to sitting on my arse waiting for the bit to drop off of its own accord. That's not going to work here though. I
just need to find the time to get in about it when I'm in the right frame of mind.
:: Saturday, November 14, 2009 ::
Right, I've had a good think about how to get the driveshaft off, ranging in levels of force. I'll start with cleaning out the allen bolt holes with
brake cleaner and my wee scraper, and hammering a decent allen key into each, and see if it turns. If that doesn't work, I'll try heating them with a
blowlamp. If that doesn't work, I'll try an impact driver, then the Irwin bolt grips, then if I have to I'll angle grind the bastards off.
Surprisingly, for me at least, option 1 works best, and I get all 6 bolts out at the hub end, within about 20 minutes. I remove the bottom bolt, and
then turn the drive shaft a sixth of a turn, put the handbrake on, remove the next bolt, brake off, turn another sixth of a turn, handbrake on etc etc.
I can't shift the bolts at the diff end of the driveshaft though, and some of them look slightly chewed as if somebody has tried unsuccessfully before
to get them off.
Never mind, I think to myself, I've got one of them wee kits that let you pull the rubber boot over a cone, from one end, so if I can get one end of
the driveshaft off, I should be able to replace both gaiters. The driveshaft can't come out of the hub carrier because the CV joint is recessed. It
almost, but not quite, fits past the edge. I mark the position of the top hub carrier bush, then remove the bolt and pull the top of the hub carrier
outwards so that the driveshaft clears the edge. Just.
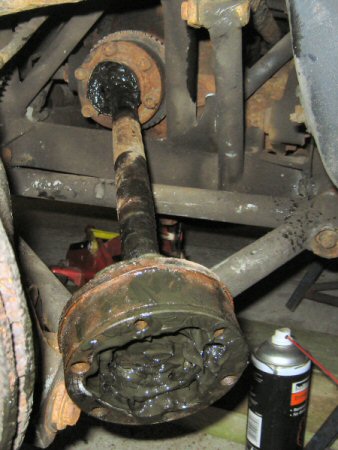
 I cut the old boots off with a knife, ready to fit the new ones. Grease up the cone, put it over the end of the driveshaft, but it won't slide over -
the cone slides off the CV joint which is wobbling about all over the place.
I cut the old boots off with a knife, ready to fit the new ones. Grease up the cone, put it over the end of the driveshaft, but it won't slide over -
the cone slides off the CV joint which is wobbling about all over the place.
Right, plan B. I'll take that CV joint off that end of the driveshaft, and fit both boots over the end of the shaft alone. I remove the wee circlip
around the shaft, and then the normal practice is to whack the joint off with an ammer. Doesn't move. Whack it again. Doesn't move. Not a bit.
Now I've got no option: I've got to get those other bolts out and take the drive shaft right off. I put the handbrake back on, and put the car in gear,
so that now the handbrake on the other side will stop the shaft from turning. Except it does. Wait a minute: how can that be? The other wheel isn't
turning (I can see that) and neither is the propshaft.
Shit, shit and thrice shit. Realisation dawns.
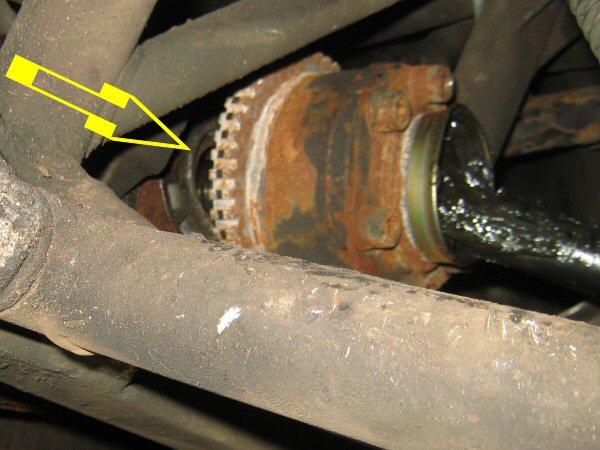
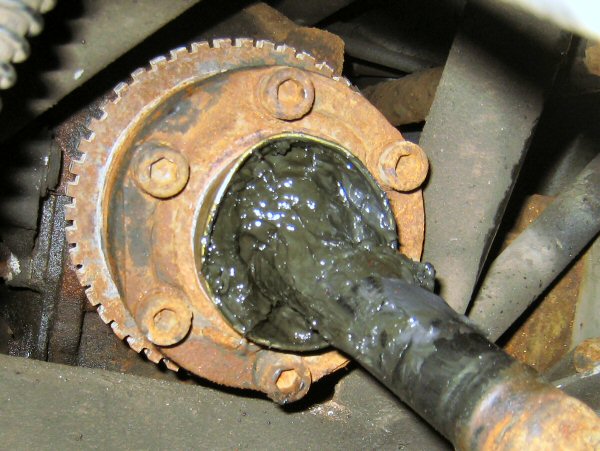
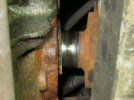
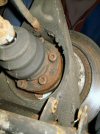
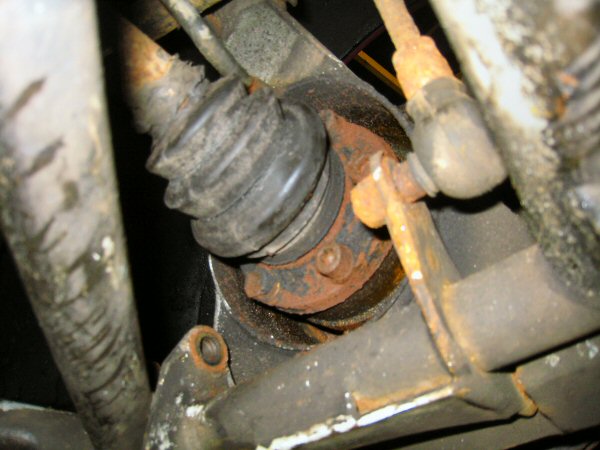
 A quick look at the diff flange shows that it's moved out of the diff with all that hammering. The yellow arrow shows the edge of the diff oil seal,
and you shouldn't be able to see that! There is usually a circlip to stop the shaft coming out, but obviously, this one didn't have one in the first
place, or it's missing, or I've broken it. Don't see how though, because half my problem was that I couldn't get a swing on the hammer to hit
it properly.
A quick look at the diff flange shows that it's moved out of the diff with all that hammering. The yellow arrow shows the edge of the diff oil seal,
and you shouldn't be able to see that! There is usually a circlip to stop the shaft coming out, but obviously, this one didn't have one in the first
place, or it's missing, or I've broken it. Don't see how though, because half my problem was that I couldn't get a swing on the hammer to hit
it properly.
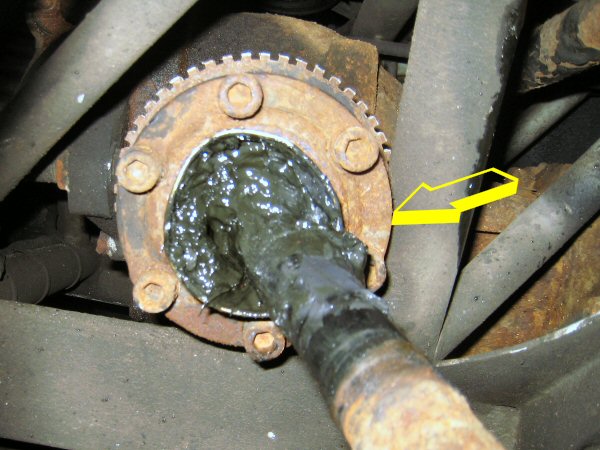
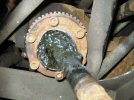
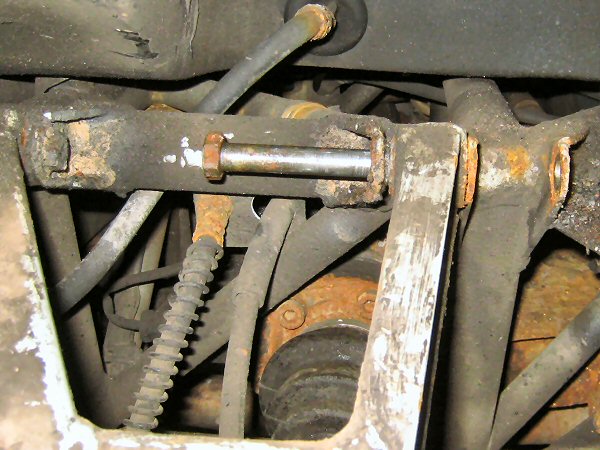
 Here it is from underneath the car, you can clearly see it's pulled out of the diff. This is very bad news. I don't know if that will push back in
again, and even if it does, I doubt that the oil seal will still work. More importantly, I don't know if there's bits of circlip lying down inside the
diff, waiting to get chewed into the gears. Bastard. I'll only say that once but I'm thinking it many times over...
Here it is from underneath the car, you can clearly see it's pulled out of the diff. This is very bad news. I don't know if that will push back in
again, and even if it does, I doubt that the oil seal will still work. More importantly, I don't know if there's bits of circlip lying down inside the
diff, waiting to get chewed into the gears. Bastard. I'll only say that once but I'm thinking it many times over...
I'm severely pissed off. I don't know what to do now. I need to ask for advice.
:: Saturday, November 14, 2009 - Update! ::
Well I posted my wee driveshaft problem on Pistonheads, and the general opinion among those who know Cerberas better than I do, is that I should just
pull the whole drive shaft out, change the boots, and then knock the output flange back into the diff, and all will be fine. Willie in particular is
helpful: he's just replaced the oil seals on his diff in
the tvrolet, and knows that there is no circlip, just a spring clip that comes out with the shaft. Knock it back in, and Robert is your avuncular
relative.
Fright over!
I'm also relieved because I thought I must have been really cack-handed to have broken anything there in the first place. At least this time, it seems
as if I haven't done anything too stupid!
:: Sunday, November 15, 2009 ::
Haven't had a chance to get back to fixing the Cerb today. Had a quick look though, and there may be another problem.
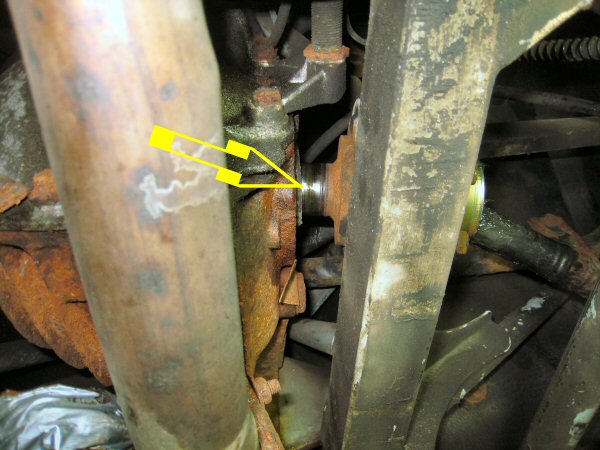
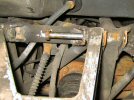
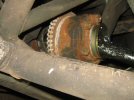
 The diff flange has a serrated lip around it (which I think is used to work the ABS on the original Granada they come from) which doesn't look as though
it will fit past the chassis rail. So I might need to take the driveshaft off to get the diff flange back in, but I might need to put that back in first,
to get the drive shaft off. Catch 22.
The diff flange has a serrated lip around it (which I think is used to work the ABS on the original Granada they come from) which doesn't look as though
it will fit past the chassis rail. So I might need to take the driveshaft off to get the diff flange back in, but I might need to put that back in first,
to get the drive shaft off. Catch 22.
 Maybe the whole part is sitting at a slight angle - it looks like it. If I lift it, it might clear the chassis. Or it might not.
Right. Plan C (or is it D?) is to take off the outer CV joint with a puller, and then try to wiggle the diff output shaft back in, then change both
boots and reassemble the CV. Or something.
:: Saturday, November 21, 2009 ::
Took Wednesday afternoon off work, to fix the Cerbera. By the time I had finished faffing about with work email and phone calls, it was nearly tea time
so I didn't bother.
Never mind, I'm off on Thursday afternoon as well, so I'll get round to it then. Except Thursday afternoon evaporates in a similar fog of procrastination.
The Cerb is too scary - I know it's only a car like all the other cars I've worked on, but it's a very complicated one, and it's easy to make a mistake
that could cost a lot of money (or worse).
Well today I'm going to get the offside rear finished and back together, following Plan C (or is it D) that I talked about last Saturday.
So the first step is to get the outer CV joint of the drive shaft. I put a 3-leg gear puller over it, get it as straight as possible so that the centre
piston is in the hole machined in the centre of the shaft, and it comes off easily (remember I took the circlip off last week!)
I clean up the end of the shaft with some rags (lots of rags - that CV grease is bloody mucky sticky stuff and it gets everywhere, and won't come off -
don't wear you best designer labels when doing this job!).
Now that the weights off the end of the shaft, I can wriggle the differential output shaft back into the splines, and I feel it engage - then I clout it
in with a big hammer against a big piece of wood against the inner CV joint. A quick check underneath confirms that Willie was right - it's popped back
into place and is held firmly and doesn't pull out again.
Plan D is going well so far!
Then I have to fit the boots - the inner one fits straight on, the outer one has to be fitted inside-out and then pulled back into place. I can't get
the boot clips tightened up because the driveshaft is at too acute an angle and is pulling the boot off the cv joints, and once I've tightened the metal
clips I wouldn't be able to loosen them again. I'll fit the clips from underneath when the driveshafts are straighter.
Then refit the CV joint - make sure it's the right way round, then push it onto the end of the shaft and knock it into place, using a big socket on
the inner race to push it back far enough to get the circlip on. One of the balls popped out during this process when the joint was on full turn in one
direction, but that's ok, clean it up, grease it and it just pops back in. Regrease the joint before you put it all back!
Then it's a simple matter of bolting the outer end of the CV joint back on to the hub flange - which sounds easier than it is, because you're trying
to line up the CV joint and the metal cover that holds the boot, with holes in the hub, so I ended up turning the ub tiny amounts to get the first bolt
to line up and the threads engaged. After that, more minor adjustments to get the second bolt in, then it's a breeze because everything's lined up by
the first through bolts. Tighten up the 6 Allen bolts and the job's a good un.
Then I fit the new Gaz Gold shock absorber, after turning it to half-way through its adjustment between soft and hard. Fit the top bolt first, get the
wishbone lined up then push the bolt through the shocker eye. Then the bottom one, then I put a jack under the hub to lift the whole assembly up to
replace the bolt holding the hub carrier to the top wishbone, being careful to replace the washers in the order they came off, and then also making
sure that the bolt is in exactly the same position on the wishbone (so that the camber is unaffected) before tightening everything up.
Replace wheel and that's one side finished! (except for the driveshaft boot clips but I'll do them before I take the car out)
Then I spend nearly an hour trying to clean CV joint grease off the garage floor, the bloody stuff is everywhere! I find out by accident that hand
scrub towels I bought, work very well!
Right, now that I've muddled through one side, I know where I went wrong so the other side should be easier. Except I don't have time today. And I'm
knackered - this isn't getting any easier as the years go by!
:: Sunday, November 22, 2009 ::
Did the other shock absorber today.

 Lessons learned yesterday: take the shock absorber off first, then the top suspension bush.
Lesson not learned: How to get the drive shaft bolts out if they are simply not for moving. As before, I clean out the allen key holes with brake cleaner
and a small scriber, but still the allen key doesn't grip. Then I try putting a torx driver in but that doesn't grip either. So then it's on to the Irwin
bolt grips but I don't have one the right size. Sod it - the boots on this side aren't too bad so I'll leave the bloody things.
So I put the new shock absorber on (after adjusting it to the same position as the other side) and put the car back together.
Then I let it down off the jack, so that the weight's on the wheels, and then jack one side of the suspension back up again so that I can tighten the clips
holding the new boots on. They tighten ok but I don't have a pair of pliers sharp enough to cut off the excess. I'll need to go back to that...
I've just realised as I write this that I forgot to check that I put the top bush in exactly the same place on the wishbone as it was. I'll have to check
that before I use it. I'll measure the camber on both sides at the car's current ride height. First I need to make a camber gauge thingy, forcos I
haven't got one.
:: Friday, November 27, 2009 ::
Time to check and adjust the camber on the Cerb's rear suspension. First I need a camber gauge. Now you can buy natty electronic digital gizmos if you
like, but that would be too easy, and not in the spirit of the engineering tradition that made Britain Great. Or me a tight-arsed git. i'm going to try
to make one. I mean... how hard can it be?
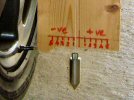
First I get a narrow plank of wood bigger then the tyre - about 500 mm seems right. Then I measure the distance across the rim at about 17 1/2 inches,
and put a couple of big screws that distance apart into the edge of the plank. I put the bottom screw right near the bottom edge of the plank. Measure
carefully to make sure they are both sticking out the same distance from the edge.
Next step is to measure in from the end of the screw, to a point roughly in the centre of the plank - about 3 1/2 inches in this case. Draw a line the
length of the plank, exactly parallel to the heads of the two screws.
Right, now this is the clever bit. You need to mark off a line showing degrees from vertical. To work this out, you have to remember that there's 360
degrees in a circle. If each degree was 1 centimetre, then the circle would be 360 cm in circumference, divide by pi to get the diameter, then 2 to get
the radius to be 573 mm. Now I decided that I didn't want the gauge to be that long, so I made mine 4/5th size - the radius is 458 mm and each degree
would then be 8mm. I had worked this out before I cut the plank to 500 mm in step 1, honest!
So - draw two lines across the plank 458 mm apart, using a set square, then knock a nail in where the two lines cross at the top, and mark off the other
line at 8mm intervals, either side of the centre line you drew. Each of those marks is one degree from vertical.
Then tie a plumb line round the nail, and let it hang free below the marks you made. I found that my tyres are so narrow that the plumb bob still touched
the ground, so I had to shorten a bit off the bottom of the board.
Then I put a bit of tape over the ends of the screws to prevent them scratching the rims.

 Here it is in use. If the plumb bob swings towards the wheel, then you have negative camber, away from the wheel, you have positive camber. You can see
here that I have 1 degree negative - exactly to spec!
Here it is in use. If the plumb bob swings towards the wheel, then you have negative camber, away from the wheel, you have positive camber. You can see
here that I have 1 degree negative - exactly to spec!
And no, my thumb isn't touching the string because that would be silly.
Note that these readings are only right if the car is parked on level ground - the same applies to any camber measurement, whether you use a bit of wood
or a full wheel alignment gauge - if the car isn't level, it's wrong!
The other side (the second side I took apart) now has zero camber, so I was right - I didn't set the top bush properly.
So I jack the car up, take the wheel off, note where the top hub carrier bush is on the wishbone, then loosen it and push it inwards a bit - about 4mm or
so should be about right (I could have worked it out by measuring the distance between the top and bottom bushes and interpolating the exact measurement,
but I couldn't be arsed). Put it all back together, start the car up, drive it backwards and forwards a bit and then measure the camber again - about 1.5
degrees - a little bit too much but I don't have time to do it again today.
The front wheels are exactly 1 degree negative - again exactly to spec.
I'll have a drive, let the ride height settle down with the new shock absorbers etc, and then check the rear cambers again. Not today though because it's
bucketing down.
I'll also refine the camber gauge a wee bit - the wheel rims are smooth and tapered, and you have to get the two screws the same distance from the edge
of the rim, which is tricky, and can affect the reading by about half a degree if it's not centralised. I think I'll move the top screw further up, so that
they are slightly further apart and the gauge locates better on the very edge of the rim. I think I might also make a hole for the pendulum to swing in,
so that the point of the bob points towards the reading scale, rather than the string. Reduces the chance of the bob touching the ground. That's not as
important for now, as moving the screw though.
I also discovered when I was checking the camber on another car, that the plumb bob moves slightly in the wind, by about 1/2 a degree, so watch for that
when you're using it outside!
Overall, though, I'm pretty pleased with my calibrated precision instrument!
 Here's the workbench now that it's finished, with storage for the more regularly used tools, and a handy storage compartment for the Elastoplast.
 The offside shock absorber next, to give me room to get to the diff bolts. The two shocker bolts come off pretty easily - the top one also holds the
front of the wishbone in place so I don't take it all the way out.
The offside shock absorber next, to give me room to get to the diff bolts. The two shocker bolts come off pretty easily - the top one also holds the
front of the wishbone in place so I don't take it all the way out.
 Take out the bottom bolt, but the shocker is still held in place by the suspension. I have to get a spare bit of 4 by 2, and lever the bottom wishbone
down to get the shocker out. I knew that spare bit of wood would be useful!
Take out the bottom bolt, but the shocker is still held in place by the suspension. I have to get a spare bit of 4 by 2, and lever the bottom wishbone
down to get the shocker out. I knew that spare bit of wood would be useful!
 At this point I notice that the new shock absorber is about an inch shorter than the one I've just taken off, so I'll probably have to adjust the ride
height when I put the new ones on. I'll also have to set up the hardness of the dampers - at the moment I turn them to about half-way between soft and
hard. Should still be better than my old ones - at the moment the car's backside feels a bit floaty, especially compared to the S, which is like riding
a barrel of bricks down a coal bing.
At this point I notice that the new shock absorber is about an inch shorter than the one I've just taken off, so I'll probably have to adjust the ride
height when I put the new ones on. I'll also have to set up the hardness of the dampers - at the moment I turn them to about half-way between soft and
hard. Should still be better than my old ones - at the moment the car's backside feels a bit floaty, especially compared to the S, which is like riding
a barrel of bricks down a coal bing.
 The drive shaft is held in place with 6 allen bolts on each end. The outer ones are full of crud so I pick all the muck out of the recesses with a wee
scriber, to get it as clean as I can so that the allen key will get a good grip. And it does - it grips really well - but as I try to loosen the first
bolt, it feels as if it is starting to round off the recessed socket so I stop. The next bolt feels the same. And the next.
The drive shaft is held in place with 6 allen bolts on each end. The outer ones are full of crud so I pick all the muck out of the recesses with a wee
scriber, to get it as clean as I can so that the allen key will get a good grip. And it does - it grips really well - but as I try to loosen the first
bolt, it feels as if it is starting to round off the recessed socket so I stop. The next bolt feels the same. And the next.