:: Diary - November 2013 ::
:: Sunday, November 3, 2013 ::
Once again, I've had people asking if I am ok, seeing as I haven't written anything here for 2 weeks or so. While their concern is touching (or they
are slightly touched), there are 3 basic reasons for this:
1. My wee business has got stupidly busy, and I have had hardly any time for playing with wee cars;
2. The weather has been pants, so I haven't had the opportunity to play with wee cars;
3. When I do have time, I've been feeling generally pissed off, for reasons not for discussion here, so I haven't had the inclination to play with wee cars.
To take the last one first, I haven't even used the Porsche since the middle of September. It has been sat outside in all the torrential rain we got
through October, so last weekend I decided to take it a run and stretch its legs. Unfortunately, although it was ok for the first 6 or 7 miles, it
started misfiring so badly that I was lucky to get it home again. I decided that it was obviously condensation, so off with the distributor cap (which
is right underneath the grill in the tail and so was soaking), dry it inside and out, and spray the cap and leads with WD40. It was a bit better after
that but not quite there.
An acquaintance who happens to run a Porsche independent specialists, advised me to check the spark plug ends of the leads which sit sideways in the
ends of the rocker covers and can collect water. Mine seemed dry but manky, so I cleaned them and gave them the WD40 treatment. Sorted!
In the meantime, I have had a couple of goes at disconnecting the TVR's battery and resetting the ECU, and then letting it run from cold to hot without
revving it at all (not even to put the charging light out). No difference, it still sits at that high idle for a few seconds. I think it's time for
specialist advice on that too.
In between all of that, and trying to do more work than I ever planned to do, I just haven't had time for writing up web sites. Nothing much to report
anyway, except that the TVR is still not right.
So there you go, all up to date now.
Anyhoo - today is TVR Club day. My TVR is still not right, the Porsche needs an "Italian tune-up", and it has a heater (that needs testing in cold
weather) so we'll go in that! I meet up with Jim and Dave and we head off for our wee pre-meeting run. By the time we reach the club meeting, I can
report that the heater works fine, as does the engine. Dave and Jim are unfortunately freezing.
Once again there a few "new boys" so we have a chat. Willie also arrives in his Tuscan racer - now rebuilt with even bigger Chevy engine, but still only
600-odd horsepower - which creates a stir.
:: Thursday, November 7, 2013 ::
I found myself in Edinburgh today, not very far from the car tuning man - so I dropped in and spoke to them about the wee idle problem. He looked as
though he knew what it was, but wasn’t telling (which is a pretty good sales technique I suppose - certainly better than a glaikit stare with your mouth wide
open while you pretend that you’re thinking). Anyway, car is booked in for Tuesday. I also told him about my problems in the past with the diagnostic
socket, but again he didn’t seem to be perturbed, and said they would just test individual sensors and outputs if they have to.
I hope it’s a worthwhile investment, because I don’t want to be doing this every ten years and 50,000 miles.
:: Saturday, November 9, 2013 ::
I forgot to say that I ordered a TVR Car Club 2014 calendar, and it arrived today.
I recognise “Miss May”!
 It’s my old Cerbera! - a photo I took last June. The car is now up for sale again, for even more than it was last time - see that’s the price of fame!
:: Tuesday, November 12, 2013 ::
Up bright and early to take the car in to the tuning man in Edinburgh.
Once he gets it all hooked up, he runs a few elementary tests and decides that the first job is to get the idle speed lower - it’s at just over 1,000 revs
as it is. His old man, who started the business in 1975, offers bits of advice on possible causes, so they check the fuel mixture in case it’s too rich
(it’s not) and the ignition timing in case it’s too far advanced (it’s not). Adjusting the throttle stop doesn’t make any difference, and eventually they
decide that there must be an air leak on the inlet side. Various manual tests don’t show anything, and I tell hime that I sprayed WD40 around all the
joints, and that didn’t make any difference either.
Then they produce an air leak tested. It’s basically a smoke generator - you fill the intake chamber with thick smoke then pressurise it - and the smoke
finds its way out, through any leaks that were letting air in.
And after a minute, that’s exactly what it does.
 This here is the joint between the plenum and the inlet manifold, just above No 1 cylinder (just beside the alternator), and that’s where the leak is.
It’s only very slight, but remember on 16 October I said “Dave notices that there's a very slight "whistle" in time with the surging. It sounds as if
it's coming from near the alternator”? Well he was right… It hasn’t made that noise before, or since, but on that day, it was definitely noticeable.
This here is the joint between the plenum and the inlet manifold, just above No 1 cylinder (just beside the alternator), and that’s where the leak is.
It’s only very slight, but remember on 16 October I said “Dave notices that there's a very slight "whistle" in time with the surging. It sounds as if
it's coming from near the alternator”? Well he was right… It hasn’t made that noise before, or since, but on that day, it was definitely noticeable.
So I need to remove the plenum and replace that gasket. While I am at it, the tuning man advises that I might as well take out another few bolts and
replace the V-shaped gasket between the inlet manifold and the cylinder heads. In the meantime, he can’t do any more tuning until I fix the leak.
I’ve got a top end gasket pack (minus exhaust gaskets), along at the farm, so I’ll have a wee trip to take the Porsche along there for the winter, and
bring back the gasket set, and then we’ll get in about this.
:: Wednesday, November 13, 2013 ::
Work is still busy. This afternoon I have 3 jobs to do, so I treat them all with equal priority, by going out and making a start on the TVR.
First step is to drain the coolant - the inlet manifold is water-heated so I want to drain it early, so that I don’t end up filling the inlets with water.
Also, the valve pushrods are exposed when the manifold is off, so you can end up with water in the oil as well. So just drain it, ok?
 I jack the car up so that I can get a bucket underneath, then remove the swirl pot cap and loosen the clips and pull off the bottom hose.
 Then I open up the bleed screw in the top of the radiator, to release the “vacuum lock” so that it drains.
 Next - the alternator. It’s mounted on a metal bracket that is bolted to the front of the timing car with two 13mm bolts (one of them is hidden by the
fan belt in this photo)…
Next - the alternator. It’s mounted on a metal bracket that is bolted to the front of the timing car with two 13mm bolts (one of them is hidden by the
fan belt in this photo)…
 and this 17mm bolt, just behind No 1 spark plug.
So the first step is to disconnect the battery, so that the whole thing doesn’t go up like a Mujahadeen piece box, and then disconnect the two cables off
the back of the alternator - a 13mm nut holds the main cable, and a 8 mm nut on the warning light wire.
 Then I loosen the adjuster bracket - this 17mm bolt…
 Then you swing the alternator inwards and remove the fan belt, then remove the two 13mm bolts and the 17mm bolt at the back, and remove the alternator
with its bracket - like this…
Then you swing the alternator inwards and remove the fan belt, then remove the two 13mm bolts and the 17mm bolt at the back, and remove the alternator
with its bracket - like this…
Note the famous carpet, that has appeared in articles and diary entries for donkey’s years - I’ve got miles of the stuff, that I lifted from my old house
and kept in my “could be useful one day” pile.
Anyway, at this point I got a message saying my camera card is full. Now I don’t want to carry on with no photos, and anyway it’s bloody freezing, so I
go back indoors to clean out the camera for next time.
Don’t say I’m not good to you.
This article is written “as it happened” so if I’ve cocked something up, you’ll know about it.
:: Thursday, November 14, 2013 ::
Another afternoon at the car, camera cleared out and ready to go.
I was looking back through the web site later last night, and I noticed that my earlier articles were much more “step-by-step” than the way I write now.
I think that’s because I’ve has the car for donkey’s years and I tend to summarise stuff I have done before, like “take the spark plugs out”, and I
forget how much grief that was, the first time I did it. That’s not very helpful to new owners, though, so I’m going to try to go back to “step at a time”.
 So, the next step is to remove the air intake hoses and the air cleaner. First remove the hoses at the throttle body, and then, if your car is an S2 or S3,
you need to disconnect the electrical connectors to the air flow meters. Make sure you note which is the top one, and which one goes underneath - I think
I read that they are not interchangeable…
So, the next step is to remove the air intake hoses and the air cleaner. First remove the hoses at the throttle body, and then, if your car is an S2 or S3,
you need to disconnect the electrical connectors to the air flow meters. Make sure you note which is the top one, and which one goes underneath - I think
I read that they are not interchangeable…
 For S3Cs and S4Cs, you don’t have to do that, so it’s straight on to removing the air cleaner by removing the two nuts holding it to the chassis.
 Now we come to the reason why we drained the coolant. There are two hoses into the thermostat from the swirl pot - the biggest and smallest stubs in
this picture. The mid-sized one has a hose going to the heater. It’s a bit disconcerting to see how rusty these are…
Now we come to the reason why we drained the coolant. There are two hoses into the thermostat from the swirl pot - the biggest and smallest stubs in
this picture. The mid-sized one has a hose going to the heater. It’s a bit disconcerting to see how rusty these are…
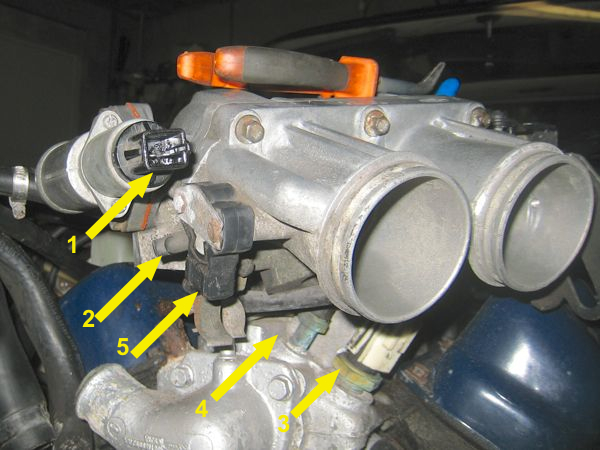
 Then I disconnect the throttle pot (1), the idle speed control valve (5), the coolant temperature sensor (3), and the temperature gauge sender (4). If
the car is a non-cat model, you also need to disconnect two vacuum hoses on the wee nipples at (2).
Then I disconnect the throttle pot (1), the idle speed control valve (5), the coolant temperature sensor (3), and the temperature gauge sender (4). If
the car is a non-cat model, you also need to disconnect two vacuum hoses on the wee nipples at (2).
 Then I remove the vacuum hoses from the plenum. This one is the brake servo hose, and underneath is a smaller hose that goes to the MAP sensor. I also
disconnect the vacuum hose at the fuel pressure regulator.
Then I remove the vacuum hoses from the plenum. This one is the brake servo hose, and underneath is a smaller hose that goes to the MAP sensor. I also
disconnect the vacuum hose at the fuel pressure regulator.
 Next, I remove the throttle cable - rather than fiddle about with the cable itself, I unclip the plastic connector from the throttle plate - you slide that
wee black clip off, then the plastic rod pulls off the wee ball joint. Then I undo the two 10mm bolts holding the throttle cable to the plenum, and swing
it out of the way.
Next, I remove the throttle cable - rather than fiddle about with the cable itself, I unclip the plastic connector from the throttle plate - you slide that
wee black clip off, then the plastic rod pulls off the wee ball joint. Then I undo the two 10mm bolts holding the throttle cable to the plenum, and swing
it out of the way.
 like this!
 Now I disconnect the fuel lines. The feed goes to the fuel rail, and the “return” comes off the pressure regulator you can see here. First you use the
wee shraeder valve you can see just behind the throttle bolts, and a rag to make sure the system is depressurised, then remove those two hoses. I also
remove the vacuum hose underneath the fuel lines, that works the crankcase ventilation system.
Now I disconnect the fuel lines. The feed goes to the fuel rail, and the “return” comes off the pressure regulator you can see here. First you use the
wee shraeder valve you can see just behind the throttle bolts, and a rag to make sure the system is depressurised, then remove those two hoses. I also
remove the vacuum hose underneath the fuel lines, that works the crankcase ventilation system.
 Round the other side, and I remove the coil from the plenum then the connectors from the fuel temp sensor (top centre of this photo) and the 6 fuel injectors.
 Then the connector to the distributor.
 And I remove the engine loom.
 So that leaves me here…
 I remove the distributor cap and plug leads, and them turn the engine with a 19mm spanner on the crankshaft, to line up the timing mark with 12 degrees BTDC.
 with the distributor rotor arm pointing at No 1 no 1 plug lead. Note the markings round the edges of the distributor - you need those to put the
distributor back, if you take it out. but I am going to try to avoid doing that. Might not work though, so I’ll make sure it’s lined up, see?
with the distributor rotor arm pointing at No 1 no 1 plug lead. Note the markings round the edges of the distributor - you need those to put the
distributor back, if you take it out. but I am going to try to avoid doing that. Might not work though, so I’ll make sure it’s lined up, see?
 I have a final check round to make sure everything is disconnected, and undo the 6 star bolts.
Now you just lift the plenum off the inlet manifold. Well not quite - it’s stuck like a limpet. I try levering it - no joy. I get a rubber hammer. No
joy. I get a bigger heavier hammer and a lump of wood,. Still no joy. Finally, I welt it sideways with the hammer with blows at ever-increasing force,
until, with a thump that’s about 0.01% lower than the the force needed to shatter the plenum into bits, it comes free.
 And here it is, upside down. You can see that the gasket has all but disappeared around the bottom left port.
 Here it is closer up - it seems that the gasket hasn’t been fitted properly at some stage (it wasn’t me, I haven’t touched this since I got the car!) so
it must have been leaking slightly for a while - I know that the idle speed has been a tiny bit high for ages (before the “sticky even higher idle” that
I am trying to cure here).
Here it is closer up - it seems that the gasket hasn’t been fitted properly at some stage (it wasn’t me, I haven’t touched this since I got the car!) so
it must have been leaking slightly for a while - I know that the idle speed has been a tiny bit high for ages (before the “sticky even higher idle” that
I am trying to cure here).
 Here’s the corresponding mating face on the manifold - again you can see that bottom right port has been leaking.
 I start to remove the remains of the gasket from the plenum, first with careful scraping, and then cleaning up with solvent. I only have time to do one,
though, before I have to start making the dinner.
I start to remove the remains of the gasket from the plenum, first with careful scraping, and then cleaning up with solvent. I only have time to do one,
though, before I have to start making the dinner.
So - that was 3 hours today working on the car, then two and a half hours processing photos, making thumbnails and writing today’s page with photo links. It’s
not easy, this. The sacrifices I make.
No instalment tomorrow - I am going to Birmingham for the Classic Car Show. So the earliest time for the next stage will be Saturday.
:: Saturday, November 16, 2013 ::
We had a brilliant say at the Classic Car Show yesterday. Great company, great chat, bag full of tat to bring home at midnight - it doesn’t get better.
I realised as I was walking aground the show, that I’ve had a pretty relaxing 3 days - work in the mornings, pulling the car to bits in the afternoon - it’s
really quite therapeutic to just immerse yourself in something, and not be distracted by anything else. And then today, lots to see, even more to eat,
I’m a lucky boy.
Anyway, I have a bit of a lie-in, then get out to the garage at about 9.30.
The first job is to finish cleaning the gasket off the mating face on the plenum.\
 Then I remove the rocker covers. There are 8 10mm bolts on each cover, then it should just pop off the head - I haven’t used hylomar last time
so they aren’t stuck down. You can see in this photo that the inlet manifold forms the upper part of the rocker cover gasket face (the shiny bit in this
photo) - that’s why you need to remove the covers to get the manifolds off.
Then I remove the rocker covers. There are 8 10mm bolts on each cover, then it should just pop off the head - I haven’t used hylomar last time
so they aren’t stuck down. You can see in this photo that the inlet manifold forms the upper part of the rocker cover gasket face (the shiny bit in this
photo) - that’s why you need to remove the covers to get the manifolds off.
 Next is removing the inlet manifold. You have to loosen the bolts in sequence to avoid distortion of the manifold - the loosening sequence is shown in the
photo. Thy are mostly 10mm bolts, but Nos 5 and 6 are 13mm nuts on long studs. As soon as I get to No 5 I realise that I can’t get on to it with the
distributor in place - there just isn’t space. I try the crowfoot spanner I have, and although it goes on, it’s up against the distributor body so can’t turn.
Next is removing the inlet manifold. You have to loosen the bolts in sequence to avoid distortion of the manifold - the loosening sequence is shown in the
photo. Thy are mostly 10mm bolts, but Nos 5 and 6 are 13mm nuts on long studs. As soon as I get to No 5 I realise that I can’t get on to it with the
distributor in place - there just isn’t space. I try the crowfoot spanner I have, and although it goes on, it’s up against the distributor body so can’t turn.
 So I need to take the distributor out. I check that the engine crankshaft and rotor arm are still sitting in the position I set them, then undo the clamp
bolt and remove the distributor by pulling it up, turning the shaft slightly as I lift, allowing the skew gears to disengage. This photo shows the position
the shaft is in as it comes free. I stuff a rag into the top of the block to prevent crap falling in.
So I need to take the distributor out. I check that the engine crankshaft and rotor arm are still sitting in the position I set them, then undo the clamp
bolt and remove the distributor by pulling it up, turning the shaft slightly as I lift, allowing the skew gears to disengage. This photo shows the position
the shaft is in as it comes free. I stuff a rag into the top of the block to prevent crap falling in.
Then I crack loose the 8 bolts and two nuts in sequence, then remove them altogether. That should let me lift off the manifold out of the Vee, but no -
I forgot something.
 I missed this hose into the front of the manifold. I disconnect it at the pump and then the manifold comes off, followed by the gasket after a bit of
gentle persuasion - it’s stuck down at the bottom of the Vee, as the manual recommends.
I missed this hose into the front of the manifold. I disconnect it at the pump and then the manifold comes off, followed by the gasket after a bit of
gentle persuasion - it’s stuck down at the bottom of the Vee, as the manual recommends.
 Here’s the engine with manifold removed. You can see the valve pushrods up each side of each inlet port.
 and here’s the manifold, upside down.
Then I remove the four wee nuts holding the fuel rail to the manifold (positions shown with blue arrows in the photo above). There are wee push-on
circlips holding the injectors into the rail, so I slide those out and pull the fuel rail off, and remove the injectors.
 Then it’s back to the scraper, to remove the remains of the gasket off the top of the manifold. Then I clean up the remainder of the manifold with degreaser
to remove the caked-on crap that you can’t get to when everything is in place on the car. I also use more carb cleaner to clean out the inside of the
intake ports.
Then it’s back to the scraper, to remove the remains of the gasket off the top of the manifold. Then I clean up the remainder of the manifold with degreaser
to remove the caked-on crap that you can’t get to when everything is in place on the car. I also use more carb cleaner to clean out the inside of the
intake ports.
It’s still not great though - I need to get this, and the plenum, looking like new before it goes back together. Not today though.
At this point, Adrian turns up and we have a chat while I finish a few bits and pieces.
 The paint is flaking off the fuel rail in big chunks - so I remove all the loose stuff and then remove the fuel pressure regulator so that I can scrape
and paint its bracket. It’s held on with two 8mm bolts and a very tight o-ring! I put one of the old injectors in, just to stop crap dropping in.
The paint is flaking off the fuel rail in big chunks - so I remove all the loose stuff and then remove the fuel pressure regulator so that I can scrape
and paint its bracket. It’s held on with two 8mm bolts and a very tight o-ring! I put one of the old injectors in, just to stop crap dropping in.
I’ve got a gasket set along at the garage at the farm - I’ll go and get it this afternoon. I’m not sure if that includes o-rings for the injectors, but I
have 9 or 10 brand new injectors I bought a while ago. I am assured they are the right ones, and they will fit, but they do look different! I think I need
to do some checking of part numbers, now that I can see them.
I’ve been so absorbed, that I haven’t noticed that it’s not lunch time, it’s 3 o’clock! No tine to get changed and get to the farm, and I need something
to finish cleaning up these bits, so I call it a day.
:: Tuesday, November 19, 2013 ::
I forgot to mention a wee act of stupidity the other day.
When I was at the engine tuner, he pointed out that the grub screw that you use to set the basic idle speed at the throttle stop, was broken. You can turn
it with pliers, but the screw slot in the end is broken.
Well I decided to fix it by flattening the end and then cutting a new slot. Easy peasy. So I unscrewed it, and the lock screw, from the throttle body bit.
The lock screw was tight with surface rust, so I decided to hold the end of the screw in mole grips while I used a wee spanner to wind the nut off.
Ping! The screw disappears out of the mole grips as they snap shut. I have the radio on so I don’t hear the screw hitting anything, it just disappears
in a flash - Paul Daniels would be proud (but not a lot). Unfortunately I haven’t got the right pages of “Sooty’s book of magic” to make the bloody thing
re-materialise, so I need a new one.
 Well today I buy an M5 set screw and nut, and cut it to length, then file the end flat and cut a screwdriver slot. I also round off the other end slightly,
where it sits against the throttle spindle. Sorted!
Well today I buy an M5 set screw and nut, and cut it to length, then file the end flat and cut a screwdriver slot. I also round off the other end slightly,
where it sits against the throttle spindle. Sorted!
:: Sunday, November 24, 2013 ::
I’ve just been faffing around with odds and ends. without making any real progress.
I start today by removing the alternator from its bracket, and then polishing it up. The top is reasonably ok (I can reach that during routine tidying up)
but underneath needs a bit more serious attention. Also, the fan blades and pulley on the front are manky. First I remove the pulley, using an allen key
in the end of the shaft and a big ring spanner on the pulley bolt. The pulley is still as tight as a wotsit though so I haste to use a puller to get it
off - I can’t show you a picture because I was using every finger I have to hold the puller in place and tighten the centre nut. I even remember to catch
the wee woodruff key under the pulley!
 First I make sure it’s free of grease, then I give it a rub down with a Scotchbrite pad, then some 1200 grade wet and dry. Then I give the whole thing a
leisurely polish - well you have to pass your time somehow, eh?
First I make sure it’s free of grease, then I give it a rub down with a Scotchbrite pad, then some 1200 grade wet and dry. Then I give the whole thing a
leisurely polish - well you have to pass your time somehow, eh?
 It scrubs up right nice, like.
Then I clean the outside of the distributor with a little cleaner and a cloth, careful not to get any crap in the gears or inside the distributor itself.
I need to clean up the inlet manifold and the plenum, before I rebuild the intake system. It’s the first thing you see when you open the bonnet, so I want
to get it tidied while it’s in bits. I also want to repaint the rocker covers and the fuel rail. They all have lots of wee fiddly corners that are a pain
to strip and clean and polish though, so… I am going to shot blast them. Except I don’t have a blaster - but I have ordered a blast cabinet for delivery
tomorrow or Tuesday, so that’ll keep me occupied!
I can blast the inlet manifold and plenum, more or less as they are. I have spare rocker covers (the ones I had polished to a mirror finish a few years
ago) so I think I’ll clean those up.

 The fuel rail is a mess - it’s steel so will rust like hell, and the paint is flaking off in chunks. First I degrease it (blasting sand doesn’t like
getting clogged with grease) and then…
The fuel rail is a mess - it’s steel so will rust like hell, and the paint is flaking off in chunks. First I degrease it (blasting sand doesn’t like
getting clogged with grease) and then…
 I plug the 6 injector sockets, and the pressure regulator on the top. I make the plugs by cutting about an inch of 1/2 inch diameter hose, and putting a
self-tapping screw in one end. Then I cover the screw in 2 layers of tape, and then wind another 2 layers round the hose. That makes each plug a tight
fit in the fuel rail socket. I also cover the fuel inlet hose, so that grit can’t get into the fuel rail.
I plug the 6 injector sockets, and the pressure regulator on the top. I make the plugs by cutting about an inch of 1/2 inch diameter hose, and putting a
self-tapping screw in one end. Then I cover the screw in 2 layers of tape, and then wind another 2 layers round the hose. That makes each plug a tight
fit in the fuel rail socket. I also cover the fuel inlet hose, so that grit can’t get into the fuel rail.
The rocker covers are painted with dark blue Hammerite, and now it seems they have discontinued that colour (you can still see “blue” for sale, but not
“dark blue”. I fancy a change anyway… a nice metallic blue I think.
:: Tuesday, November 26, 2013 ::
 Here’s my new toy! After I get it set up, and the hopper filled with glass beads, I go into a blast-cleaning frenzy, starting with wee bits like the
alternator fan and pulley.
Here’s my new toy! After I get it set up, and the hopper filled with glass beads, I go into a blast-cleaning frenzy, starting with wee bits like the
alternator fan and pulley.
 Then I get adventurous and go for the rocker covers. I should have taken a “before” photo but I was too excited - but believe me, they were dire - covered
in dust, and fairly rusty. This is them after a combination of bead blasting on the tricky bits and flap wheel on the big flat bits. I clean out the
inside as well, but I’m not confident that I’ve removed all the dust inside, above the baffle plates.
Then I get adventurous and go for the rocker covers. I should have taken a “before” photo but I was too excited - but believe me, they were dire - covered
in dust, and fairly rusty. This is them after a combination of bead blasting on the tricky bits and flap wheel on the big flat bits. I clean out the
inside as well, but I’m not confident that I’ve removed all the dust inside, above the baffle plates.
Then I try the fuel rail - and the bead blaster won’t even look at it. I think I need a different abrasive but I don’t have any. I’ll do it with sandpaper.
 Then it’s on to the inlet manifold, and that comes up great! Then I give the whole thing a spray with carb cleaner, mainly to clean the glass dust out of
the intakes.
Then it’s on to the inlet manifold, and that comes up great! Then I give the whole thing a spray with carb cleaner, mainly to clean the glass dust out of
the intakes.
That’s got me thinking though - I think I need to dismantle the throttle body and the idle speed valve from the plenum, because now I can see that I’ll
never clear all this glass shit out of there while it’s all in one piece.
I’ve also realised something else while I was doing the inlet manifold - although it fits in the cabinet easily, you can’t access the ends because your
hand, holding the gun, is restricted by where the glove hole is. Also, the gun itself has two rubber hoses (one for air and one to pick up the glass
beads) and it’s not easy to manoeuvre and twist. So doing the ends of a big workpiece is impossible. Another reason to take the throttle and plenum apart.
Impressions of the blast cabinet? Well, despite the fact that it’s meant to be a “sealed system”, there’s glass beads coming out of the seams, and also
around the edges of the glass door (which means “right in your face” if you’re peering in trying to see what you’re doing). By the time I’ve finished
the work, I’ve got glass beads under both sides of the cabinet, and all over my clothes.
I brush the glass into a bag, and also clean up around the seams and door. Then I stick an extra door gasket seal around the edge of the glass. I’m also
going to stick some sealer around the seams to try and keep this gritty shit on the inside of the cabinet, away from the shitty git on the outside. I
also decide to wear a filter mask and safety specs until I’m sure I’ve got the bloody thing sealed.
 It’s my old Cerbera! - a photo I took last June. The car is now up for sale again, for even more than it was last time - see that’s the price of fame!