:: Diary - March 2026 ::
:: Sunday, 1 March 2026 ::
Another TVR Car Club day, with the usual exciting TVR-related announcements and events. That is to say, absolutely feck all. I found out by
coincidence that the Celtic Gathering takes place next weekend, about 3 miles from my house. There hasn't been a single mention, far less an
announcement. No wonder I have abandonment issues...
At our wee table for the older models (both the members and our cars), discussion of TVRs is limited mainly to Wedges, particularly one of Eric's
extensive fleet of wedges, which he is restoring to working order. It currently has battery charging issues (particularly the ignition light staying
on, dimly, while the engine is running). We discuss our understanding of how the charging and ignition light system works, and he has a few more
wee tests to do.
My two TVRs are both "ready to go", apart from maybe checking over the Vixen's carb settings. I've been waiting since November for a dry day for
testing!
We also discovered (again, by our own research) that we need to buy tickets for the TVRCC Season Opener in England in May. It's only our wee group
that goes, it's never announced as an official "Central Scotland Group" weekend, and that's fine. The last time a bigger group went to an event in
England, donkey's years ago, it took us hours to get home, partly because someone or other couldn't keep up and got lost, or had no idea how to travel
together and got lost, or fucked off into the distance then got lost. Also, every stop took as long as the speed of the slowest eater, and one or
two spent so much time blethering that they hadn't started their dinner by the time I was finished mine. I doubt that they are aware that some
meals are actually served hot.
It's far, far better to travel in a small group of folk that know each other, know how we work when driving, and know how to keep together. Mostly.
Nobody outside our wee group asks about my new orange moon buggy, that I brought Dave and Eric in. You would think that a group of car enthusiasts
might be even a wee bit interested, but no. Maybe I'm just not showy-offy enough. Feckin' abandonment issues again...
:: Wednesday, 4 March 2026 ::
We've had a couple of half-decent weather days, so after our discussions at the meeting on Sunday, thoughts have returned to getting the cars ready
for the various trips etc over the summer. The S is pretty much there, but I have still to look at the Vixen's carburettor settings. Even with the
mixture screw turned in as far as it will go, the engine still runs, so I think it's either getting too much air, or not enough fuel, and that's
leading to the hesitation when you start to put power on from idle.
Now, I could take it to a "tuner", but who? Their first question would be "where do I plug in the computer?" Who still does proper "tuning" of
old-skool carb cars?
Let me explain my cynicism... a long time ago, I had an NSU Prinz (you can read about that under "cars I have owned" in the menu bar on the left there).
When I got it, it had even less power than the nearly zero bhp that it was born with. I took it back to the garage I bought it from, who said that
they had "crypton-tuned it" and there was nothing wrong with it.
Useless bastards - so I decided to look at it myself, and found that one of its two ignition leads was shorting, where the insulation had melted
through against the edge of the exhust manifold. It was only running on 1 cylinder. I found it by getting an HT shock right up my arm, whereupon
my mother, standing nearbly, discovered that I knew a lot more swear words than I had previously disclosed in my innocent young life.
Many years later (but still over 30 years ago!) I had a Vauxhall Astra 1.3L as a company car. I had to get it serviced at a main dealer in Glasgow,
where I worked at the time. When I got it back, it was misfiring like hell, and they wouldn't look at it because everyone had already gone home. I
had to drive 34 miles home, and then 34 miles back the next day, at a max speed of 30 mph...
They took it in first thing, and then called me at around 5pm to tell me it was ready. When I turned up, they said "no fault found" and handed me
the keys... well, it could hardly reach the end of their car park. Once again, they wouldn't look at it because everyone had already gone home,
but the service manager took me through to their empty workshop and explained that he had a staff of fully-trained expert mechanics, and a £35,000
diagnostic machine. "If they can't find a fault using that machine," he said, "there isn't a fault"". He was very polite, but I recognise a "fuck
off" when I hear one, so again I had to drive 34 miles home, at a max speed of 30 mph...
By this time I was so pissed off that, company car or no, I decided to look at it myself. It took me less than 5 minutes to isolate cylinder number
1 as the misfiring culprit (by removing plug leads one at a time), and another minute to diagnose that their new spark plug, inserted during the
service, was "outside unfucked specification". The ceramic had broken under the ministrations of their expert spanner-wielding gibbon, and was
covering the spark gap, so no firey. I horsed in another spare plug and it ran as sweet as a very sweet thing... in less than 5 minutes, with
elementary tools. Oh and a half-functioning brain.
Back to the main stealers next morning - hauled the service manager to the counter and said "remember you told me about your fully-equipped experts
and how they could find any fault? Well, they didn't find this," as I handed him the spark plug. "I found and fixed that non-existent fault in
under 5 minutes." He was suitably embarrassed and offered me back the price of the spark plugs. He recognised the undertone of "stupid arrogant
tosser" when he heard it though, so I negotiated the refund up to the full price of the service, just to encourage further training in the dying art of
fault diagnosis.
I was watching an episode of "Bangers and Cash" the other night, and they had taken in a Crypton Tuner. Most of them didn't know what it was. One
or two knew what it was, but had never learned how to work one. The general opinion was that they were shite at the time, so they were totally
useless now... QED.
Anyway, I digress. Suffice to say that I would rather have a go at this myself than try to find someone old enough and good enough to do it for me.
So I've done a bit of research, and found some basic jets and settings for the Weber 32/36 carb. Then on a Ford owners website, I found slightly
different recommended settings for a 1600 crossflow. What I don't know, is what jets are in my carb - I took it apart in October 2024, wrote them
down, then lost the bit of paper...
So on Tuesday, I decided to investigate by taking the top off the carb - first remove the air cleaner, then disconnect the wee choke lever, remove
the fuel line and undo the 6 screws holding the top on the carb.
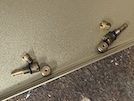
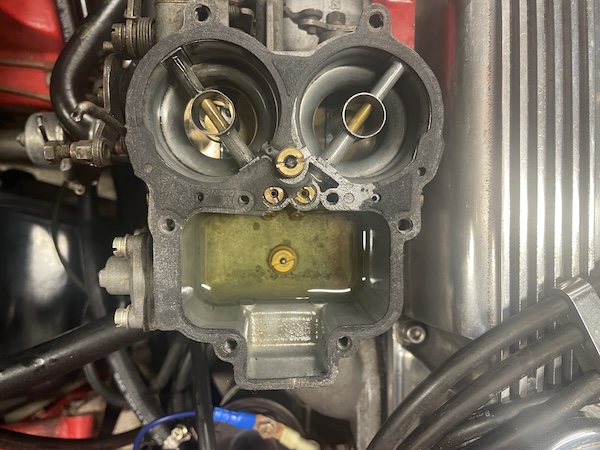
 This is the top of the carb, where you can see the two air corrector jets in the top. There are also two main jets in the bottom of the bowl (under
those air jets) and two idle jets in the sides of the carb (not really visible in this photo). I take all of those out, noting exactly which goes
where, and their sizes.
This is the top of the carb, where you can see the two air corrector jets in the top. There are also two main jets in the bottom of the bowl (under
those air jets) and two idle jets in the sides of the carb (not really visible in this photo). I take all of those out, noting exactly which goes
where, and their sizes.
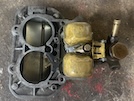
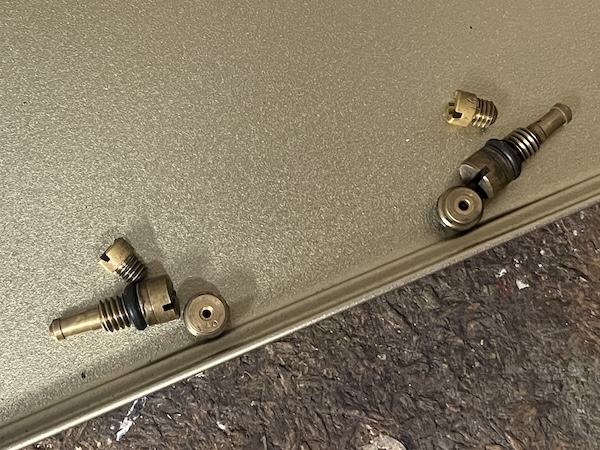
 Here's the removed jets for the primary inlet (left hand side) and secondary (right hand side).
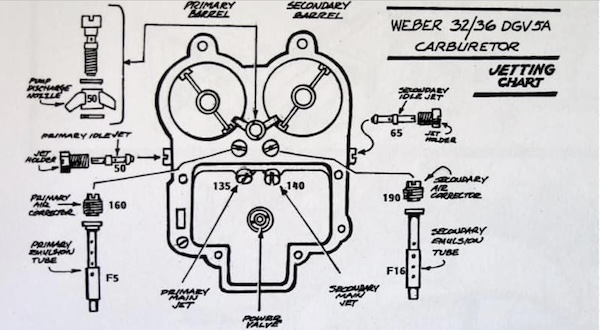
This is a diagram that I found online that shows the position of these jets, and the recommended sizes. I also found a slightly different list of
settings on a Ford Owners club website for a 1600 crossflow GT engine - which is what mine is. More on that in a minute.
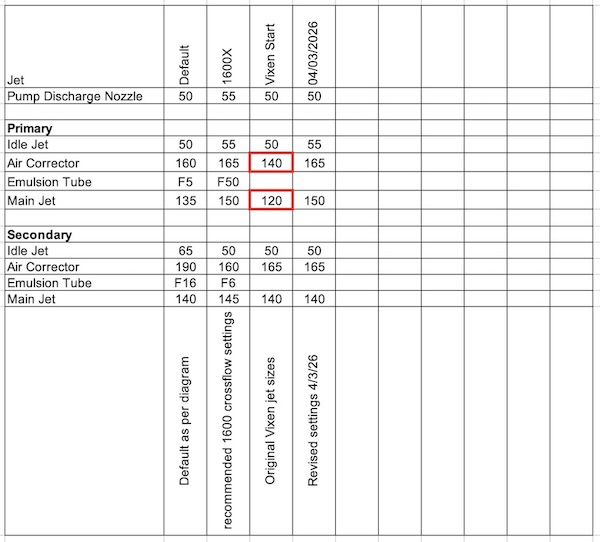
Here's a wee table. Who doesn't love a table, right? (not in the physical sense, obviously, shagging your furniture is not "de rigeur" in polite
society). The first column shows the jet settings in the diagram above. The second column shows the settings from the owners club website. Pretty
similar, but with a bigger primary main jet and smaller secondary air corrector.

The third column shows the jet sizes that I took out of the Vixen. Much smaller jets on the primary side, slightly more air on the secondary side.
I have no idea why they have been set as they are, that's just how I found them.
At this point I have to stop and rack my brain trying to remember how carburettors work. I know that at idle speed, the air corrector and the idle
jet work together to meter the amount of fuel reaching the idle mixture screw. My engine is idling with the mixture screw almost all the way in, so
that maybe suggests that the air jet isn't big enough?
Also, the primary main jet seems to be much too small - could that be leading to the "flat spot" as the carb transitions from "idle" to "open"?
After much consideration, I decide to leave the secondary jets as they were, but increase the jets on the primary side to the sizes for the 1600 GT.
Here's an updated table, that includes the revised jetting that I settled on.
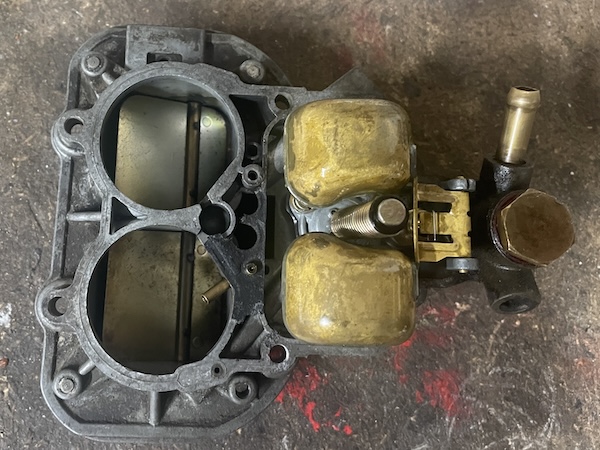
 Then I check the float height. Here's the top of the carb upside down with the floats in place.
To set the correct float height, you hold the carburettor top vertically so that the tab is just resting on the needle valve. For a brass float, the
bottom of the float should be 41mm from the face of the top surface. Then you turn the carb top the right way up so that the float is hanging, and
the bottom of the float should be 51mm from the face of the top surface, as shown in the left hand diagram. Mine was about 2mm too low, so the needle
valve would be closing slightly too early, which would lead to a slightly weak mixture. I bend the wee tab on the needle ball valve slightly, to set
it right.
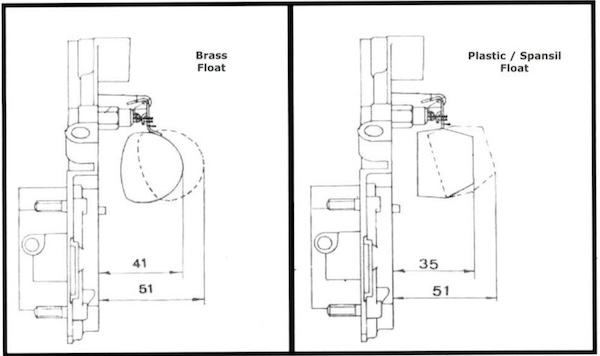
The diagram on the right is for plastic floats, which are a different shape and more "floaty".
So with that all set, I reassemble the carb, reconnect the choke and replace the air cleaner. I wind out the mixture screw to a starting position
of 3 full turns from closed, and start it up! Once it has warmed up a bit, I adjust the mixture screw to "best idle" and then reset the idle speed.
Then the mixture again and then the idle speed. After a third time, it's idling fairly smoothly at around 850 rpm. I couldn't get it to idle below
around 1,000 rpm before.
I don't have a rolling road, and it's getting dark, so no time for a test drive. I switch it off before it overheats, and I'll try it again
tomorrow.
There we go - a day that sums up this website! Half a page of slavering pish, and half a page of technical discussion (which may well also turn out
to be slavering pish, if you know anyuthing about carburettor tuning). Life is all about balance.
:: Thursday, 5 March 2026 ::
Right, time for the rolling road test - or a couple of miles around the roads near the house, to try out these delicate tuning adjustments.
It starts up lovely, and idles fine while I shut up the garage. On the road, it's definitely pulling away from junctions better, and even changing
gear seems smoother without the flat spot just as you press the accelerator. The idle speed seems scary slow, but it's smooth enough and picks up
as soon as you touch the throttle. It does seem better, so I'll leave those settings for now, and see if any minor changes are needed when I've
driven it a bit.
It's starting to rain though, so back to the garage and leave it idling to see of the temperature rises again - and it does! I leave it to cool,
and then check the coolant level. This is where the lame excuses start...
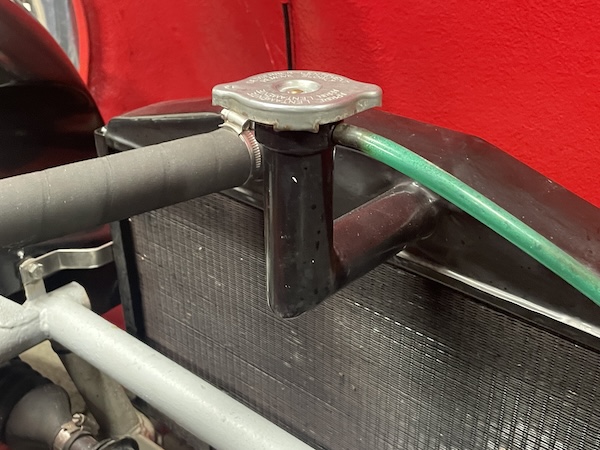
 The radiator should be full up to the bottom of that right-angle neck under the radiator cap. You remove the cap, you look down and you see water.
No, you see the bottom of the horizontal tube. It looks wet, but that's not the water level...
The radiator should be full up to the bottom of that right-angle neck under the radiator cap. You remove the cap, you look down and you see water.
No, you see the bottom of the horizontal tube. It looks wet, but that's not the water level...
I pour in some mixed antifreeze - a surprising amount of antifreeze, probably at least 2 litres, until there is deifinitely water in the bottom of
the tube. I start the car again, and leave it to idle while I tidy the garage. The temp needle stays exactly where it should.
Skoolboy error - glad I found it before any longer runs! There has never been any sign of steam or water leaking from the cooling system, but I'll
have to just keep a wee eye on that!
:: Saturday, 7 March 2026 ::
Remember last weeken, I wrote about the mystical Celtic Gathering taking place this weekend, that we didn't know about? Well, it seems I was wrong
- I found an email from March last year with the dates for this year. Nevertheless, it hasn't been mentioned since. You know when you're not wanted...
Well, not until they need you. Dave got a phone call this morning, one of the Irish contingent broke his sump bolt, needs a new sump plug and a
refill of oil. Dave is a better person than me, so he headed up there with a spare sump plug and some oil, and fixed it. I suspect I might have been
busy.
It seems our AA service has extended to groups that don't even want us to be there.
Meanwhile, I cleaned up the Vixen, and then had another wee test run. It's definitely running a lot better when moving away from junctions, or after
changing gear. On the way hope, I stop off at the supermarket, where a couple come over to see the car when I park. Then another dad and son when I
come back. All very nice!
:: Tuesday, 10 March 2026 ::
I nearly "done an Adrian"! I mean to service both TVRs before the summer, and the fact that snow fell, but then melted within a couple of hours,
reminded me that our Scottish summer is almost here!
A rake through the garage shows that I have plenty oil (of different types!) to service both cars, and two spare oil filters for the Vixen. I don't
have any oil or fuel filters for the S though, so I ordered those yesterday, and they should be available for collection tomorrow.
Today, though, it's Vixen service day. I start, as you always do, by starting and warming the car up a wee bit, just to thin the oil, and then
remove the drain plug and empty the oil into a tray. Then I can remove the filter and fit a new one. I replace the drain plug with a new copper
washer, and refill the oil to just a fraction below the full mark.
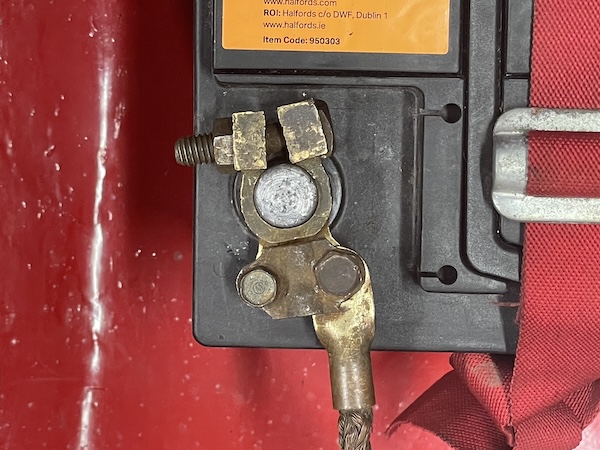
For a while, I have noticed that when I start the Vixen from cold, it often sounds as if the battery is flat - and then it jumps into life. I have
a look at the battery connections, and notice that the earth clamp is almost closed up by the pinch bolt, It's also a bit corroded.
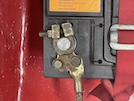 I remove the clamp, and disconnect it from the cable. The earth clamp has an eyelet on the end, which is fixed to the clamp by a wee bolt. All of
it is rusty, so connections can't be good. I clean up the eyelet, the cable clamp, the battery clamp and the battery post with sandpaper, and
bend the main clamp apart a bit so that the pinch bolt grips the battery post tightly. That should be better!
I remove the clamp, and disconnect it from the cable. The earth clamp has an eyelet on the end, which is fixed to the clamp by a wee bolt. All of
it is rusty, so connections can't be good. I clean up the eyelet, the cable clamp, the battery clamp and the battery post with sandpaper, and
bend the main clamp apart a bit so that the pinch bolt grips the battery post tightly. That should be better!
Next, I remove the gearbox level plug, and use a big syringe to top it up with Hypoid 80 gear oil (GL-4 spec - they say that the brass synchro
rings in old gearboxes don't like the additives in GL-5 spec oils.) Then I remove the differential filler plug and top that up with Hypoid 90 GL-5
oil (you can just wiggle a 1 litre bottle in to the available space above the drive shaft, so no need for a syringe).
Then I go around all of the grease nipples - 2 in the handbrake cable, 2 in the rear hub carriers, 2 in the front trunnions (although I think one
of them is blocked - I need to take that out and clear it), and one in the top of the steering rack.
That might seem like a pretty short list for a full service - but when you're driving a car all the time, you're carrying out a lot of "service
items" all the time - making sure lights work, brakes pull evenly, checking for oil and exhaust leaks etc etc, so you don't particularly have to go
through the routine of checking them as you would on someone else's car. Not that I like working on someone else's car - I learned a very long time
ago that people can easily expert a lifetime guarantee on all moving parts, whether you touched them or not.
Total working time - probalby about an hour. Total time taken - about 3 hours, allowing for resealing one of the hydraulic connectors in the lifts,
farting about refilling the grease gun, farting about filling the syringe with gear oil and cleaning up myself, the bench, the floor and various
tools afterwards, emptying the drain pan into another empty oil can for disposal, lowering the car and putting the lifts away, eating a breakfast
roll, and god only knows what else.
Eventually, though, I'm ready for a wee test drive. The car starts up easily, and drives really well. It's transformed at low engine speeds, but
still had that exhaust resonance at around 2,500 rpm. It's lovely to drive though, and it sounds great.
I'm happy with half-a-day well spent. Next - TVR S3C!
:: Saturday, 14 March 2026 ::
Mrs Git is away into Edinburgh today for a mother's day treat, so it's time for another day on servicing TVRs - the faithfull old S-Series this
time! I've realised that I print out a schedule every year, but it's not on this site or on the site at TVRSSeries.co.uk. Well, it wasn't, but it
is now! You can go to the schedule by clicking here or by following the links from the
"links" page in the wee menu on the left there.
One of the advantages of the older TVRs like the S and the Vixen, is that they are relatively simple to service. Yes, some items need specialist
equipment, but for the most part, you don’t need specialist tools to keep your S on the road – most of the jobs are well within the capabilities
of a reasonably competent home mechaninc - or even a certifiably incompetent one like me!
For me, one of the attractions of the S-series (and then the Vixen) was its simplicity, the fact that it uses mainly bits from other mass-produced
cars and is fairly easy to maintain. I have maintained my S at home during the 23 years and 60,000 miles I have owned it, as some of you will know,
at a fraction of the cost that a garage would charge. For example, a full service, including oil change, plugs, filters etc is about £40, and takes
a day if you do it all at once (although I tend to do services in bits over a period of a couple of weeks, mainly because I’m old and fat and can’t
work that hard for a whole day!)
Or can I? I did the Vixen in a day earlier in the week, and today it's pissing rain, I've been left without adult supervision, and the chip shop
isn't open yet. Let's see how we get on the available time.
As well as being cheaper, it’s nice to KNOW that you’ve done everything, and that you haven’t cut corners, or at least, if you have, you haven’t
paid somebody else to cut corners on your behalf.
 First I get the car up on ramps then I check for oil leaks. Starting at the top, the most likely candidates are the rocker cover gaskets, the front
and rear crankshaft seals, and the sump gasket or drain plug. Small oil leaks from these places are messy but not immediately critical. Oil leaking
from anywhere else on the engine is probably an indication of something more serious. Nothing seems unusual (ie, just the usual oil!).
First I get the car up on ramps then I check for oil leaks. Starting at the top, the most likely candidates are the rocker cover gaskets, the front
and rear crankshaft seals, and the sump gasket or drain plug. Small oil leaks from these places are messy but not immediately critical. Oil leaking
from anywhere else on the engine is probably an indication of something more serious. Nothing seems unusual (ie, just the usual oil!).
Next, I remove the sump plug and allow the engine oil to drain into a basin. When it’s drained (or slowed to a faint trickle) PUT THE SUMP PLUG BACK
IN and tighten it.
Then I move the basin under the oil filter, under the driver’s side of the engine, and loosen the filter, which can be difficult because there isn’t
much room between the engine and the chassis. I bought proper filter pliers, but I don't need them, because I only put filters on hand-tight. Easy-peasy.
Then I wipe a little clean oil onto the rubber seal on the new filter, then spin it onto the thread and hand-tighten it.
Then I remove the oil cap from the left hand rocker cover, and refill the engine with oil – letting it drain down from the rocker covers before
checking the level on the dipstick - bearu=ing in mind that the filter is empty and will fill up when I start the engine.
While the oil is settling, I take out the spark plugs and check that they are all working, and not too black and sooty, and not cracked. I clean
them up with a brass brush and put them back in the engine.
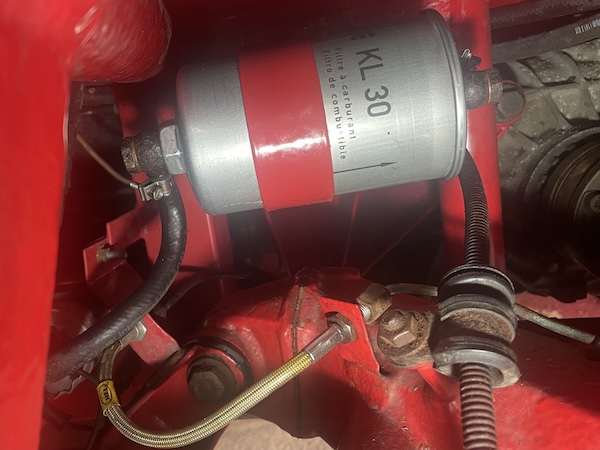
Next, the fuel filter. I remove the offside rear wheel and loosen the banjo bolts, then the clamp bolt. Then I can remove the banjos and remove the
filter, while it empties petrol all over the floor...
 New filter in, tighten banjos and then the clamp bolt. Then I switch on the ignition to energise the pump to make sure the banjos aren't leaking.
Back under the car, I check for leaks in the gearbox and differential, and take out the filler plugs to check the oil levels. Both are a little low,
so the oil syringe is refilled and brought back into play!
Then I remove the front wheels to check brake pad wear, and that the calipers are moving freely. I check that the brake fluid is topped up, and
then I use my wee "Lidl-centre-aisle" tester to confirm that the fluid doesn't have a high moisture content - it's less than 1% so ok.
Like the Vixen, when you're driving a car all the time, you're carrying out a lot of "service checks" as you go, so you don't particularly have to
go through the full checklist. I do carry out a few additional checks though:
coolant level;
clean air cleaner element;
power steering system for leaks;
lubricate door locks;
And that's it! I've spent 4 happy hours at this today, all that's needed now is a wee test drive when the roads are dry!
:: Saturday, 14 March 2026 (Supplementary) ::
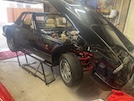
Service done, and still unsupervised - so I decide to play with some photo tools, using some of the photos from this site. First, from our wee trip
last year:

And then a photo I took in 2020, just after I got the S back from its chassis refurb:

Yes I know - I have far too much time on my hands...
:: Saturday, 21 March 2026 ::
I took the S out for a wee run on Wednesday, just to make sure that everything is ok after its service last weekend - and it isn't! It has had a
mid-range misfire / flat spot for a while: I remember faffing around with spark plugs etc last year, but it has never been completely resolved.
It's very similar to the carb problem on the Vixen, but a bit higher up the rev range - around 2,500 rpm under load. You can't fix it by re-jetting
carbs etc, on a fuel-injection engine, so let's try something else.
I unplugged the throttle position sensor, and used a multimeter to test for continuity as I opened the throttle (with the engine off - this is an
electrical test not an engine one). There seemed to be breaks in resistance as the throttle moved, so I guessed (and it's no more than a guess) that
the contacts inside the sensor might be worn. A new one ranges from around £38 to £78 (as far as I can see, for the identical part with identical
markings) so I ordered one up.
Well, it arrived last night, so let's fit it and see if it helps. Swapping it is easy - unplug it, then remove the two tiny set screws holding it
on to the intake. Pop the new one on, refit the screws, plug it back in again and it's good to go!
Another wee test drive, and it seems to be better - mid-range pickup is much smoother, and even cold-start idling seems to be better. There's
still the slightest wee flat spot at that same rev range under load, but nowhere near as bad as it was. We'll see if that sorts itself out, or gets
worse in time! I can live with it as it is though.
:: Monday, 23 March 2026 ::
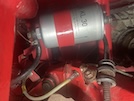
After the throttle pot success of Saturday, I've had a think about maybe also replacing the lambda sensors - they have been in since February 2014,
and were changed after the old ones were shown to be faulty by a car tuning guy who is no longer in business. I discovered then, that the original
Bosch sensors were no longer available, and Bosch part no LS3294 was recommended as the alternative. Those no longer seem to be available either,
and the choice of alternatives isn't very good... Putting the reg number into sites like autodoc or euro car parts identifies the right car, as a
TVR 290S, but no suitable lambda sensors.
I manage to find some sensors for a 2.9 Granada (same engine!) but the choice is limited...
Then I look up Sierra 2.9s (the XR4i and XR4x4 for example) in the classified ads, and get a reg number from the advert photos. If I put that reg
number into the parts sites search engines, I get a better choice of suitable sensors - none of them Bosch though...
Let's see now - those sensors work on very low voltages (5V) and resistances that change only slightly between "lean" and "rich" - so the first
step, I think, is to make sure that there's no extra resistance in the circuit. I unplug each sensor, and give them a good clean out with electrical
contact cleaner, and then plug them back in again.
The car seems to be slightly better than it was on Saturday, and you can only detect any hesitation if you are really looking for it. I think I'll
leave it alone for now.
:: Tuesday, 24 March 2026 ::
 It's the Vixen's MOT day. Yes I know that it's older than 40 years so doesn't need one, but a wee annual independent check can't do any harm can
it? Not unless it fails so badly that he puts it off the road.
It's the Vixen's MOT day. Yes I know that it's older than 40 years so doesn't need one, but a wee annual independent check can't do any harm can
it? Not unless it fails so badly that he puts it off the road.
I have undertaken the necessary pre-MOT preparations though!
 Actual photo of MOT tester under the car...
(Explanatory note, because you can never be too careful in these politically-correct grass-on-your-neighbour times - This is not an actual MOT tester
in a real-life MOT situation, but is played by an actor / author and general genius. The photo does not even depict a TVR Vixen (far less mine), and
wasn't even taken today either. If you found this explanation helpful, maybe you need a sense of humour transplant. You'll find plenty of donors who
have never used theirs.)
Anyway, it's a pass! A couple of advisories relating to slight play in an inner steering rack joint (probably because the grease nipple was
blocked last week, and I need to take it out and clear it, and pump some grease in) and slight play in a suspension ball joint (which I though were
Triumph Spitfire, but they're not - they are TVR one-offs).
Nevertheless, it's all good and I'm happy. Even happier when I get home and nobody has skelped the front off it along the way.
:: Friday, 27 March 2026 ::
It's confession time. I'm a muppet. I know that's not exactly a revelation, seeing as it's not the first act of muppetry committed and documented
in these pages, during the repair of various models in TVR's fine range of automobiles. It was a simple mistake that could have had serious
consequences.
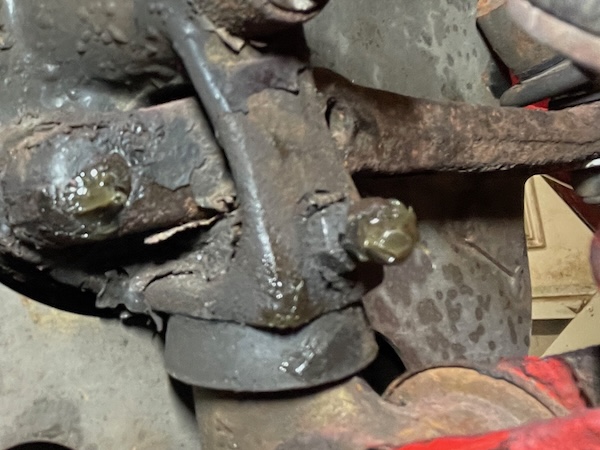
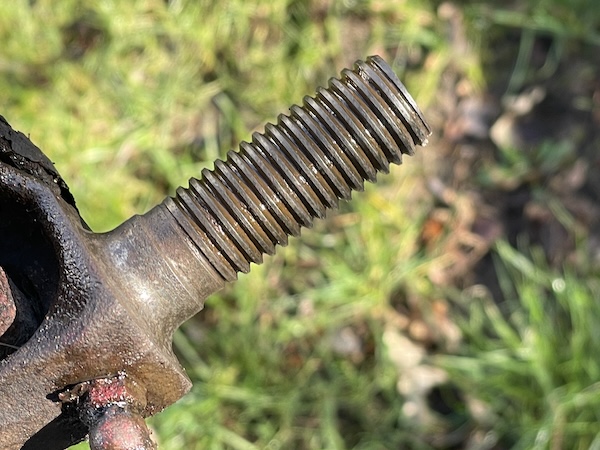
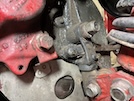
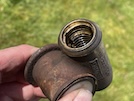
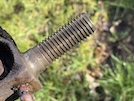
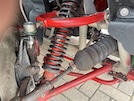
 See this? It's a grease nipple on the Vixen's front suspension. To be specific, it's the grease nipple that was blocked, and wouldn't take in any
grease during the service last week.
See this? It's a grease nipple on the Vixen's front suspension. To be specific, it's the grease nipple that was blocked, and wouldn't take in any
grease during the service last week.
Now I know that it's very important to make sure those are well-lubricated. If the trunnions seize up, they snap, and then the front hub dislocates
itself from the bottom wishbone and the whole wheel, hub, brake and everything folds outwards through the wing, or folds under the car. In either
case, a lot of bodywork damage ensues as the wheel tries to escape from the wheelarch and the chassis scrapes along the ground.
Damage to the interior of the car would normally be limited to cleaning up the torrent of shit involuntarily released by this sudden surprise,
although in more extreme cases, you might get seriously hurt as your three-wheeler car tries to jump over its own front wheel, into the
surrounding scenery.
The suspension parts are Triumph Herald. The Lotus Esprit uses exactly the same parts.
So, best to keep it lubricated properly eh? So what's the problem?
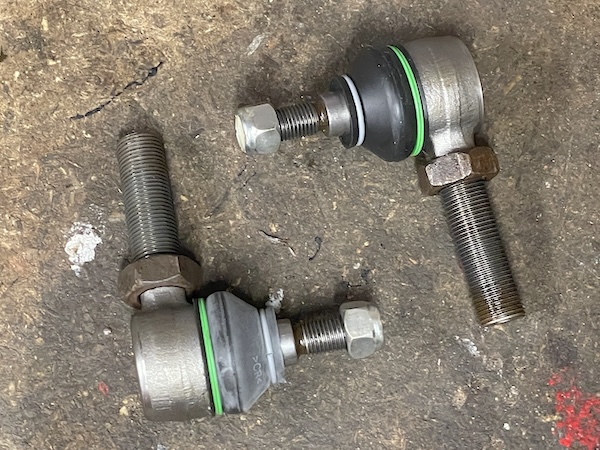
Well, the MOT on Tuesday came with an advisory of "slight play in the top ball joint" - not the trunnion, but the top. I've ordered new ball joints,
and that should be a relatively easy job. However, while searching for the right parts (the Triumph Herald uses a different top wishbone and
different balljoint), I browsed upon various pages discussing lubrication of that bottom trunnion. And this is where I realised my act of muppetry.
You see a grease nipple, you pump grease in, right? Wrong! The front trunnions on Triumph Heralds, Lotus Esprits and TVR Vixens are not lubricated
by grease, but by EP90 gear oil... If you put grease in, it clogs the oilway through the centre of the trunnion, blocks the threads, then goes hard,
and then the trunnion gets no lubrication when you turn the steering. Then it corrodes. Then it breaks. Then you have the rather invigorating "car
hits road / shit hits seats / car hits scenery" scenario we talked about earlier.
And the first sign of hard grease? When you can't pump any more in.
Bugger.
So the relatively simple job of replacing one suspension ball joint has now turned into "remove the whole front hub assembly, strip, check and
lubricate the trunnion, replace any bits as necessary, and put it all back together again". On both sides... At least all the bits are available if
I find that I need to replace anything, once I've got them apart.
Why could I not have discovered this over the winter, when I didn't want to use the car anyway? On the plus side, though, I've found it before the
summer, when there's the greatest risk of the suspension falling apart!
:: Saturday, 28 March 2026 ::
My plan today was to work in the garden. I spent hours yesterday power washing the patio and raised beds in the back garden, being careful not to
blast the paint back off the fence, that I painted only last weekend (see, my life isn't limited exclusively to playing with TVRs!). I was going to
clean the driveway today, but it pissed rain for most of last night, so that's a no-go. I try to pretend that I'm disappointed.
This change in plan gives me the opportunity to get tore into the Vixen's front suspension, so that I can examine the parts for wear and order any
new parts I need, in plenty of time.
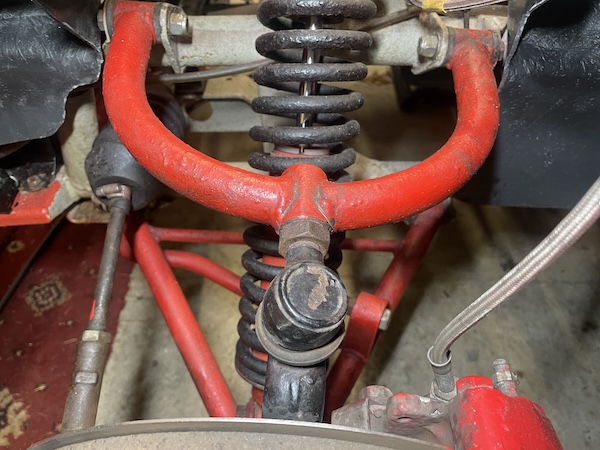
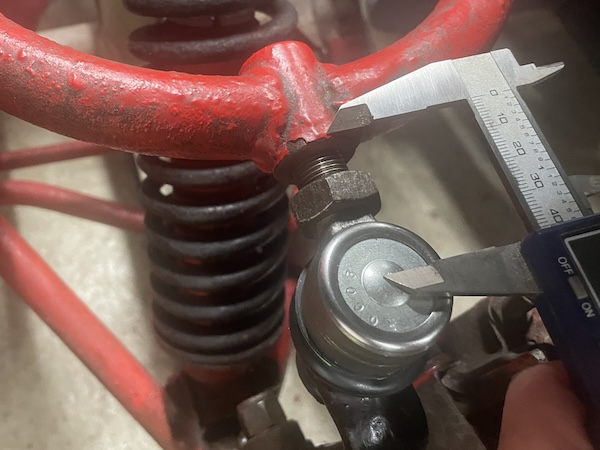
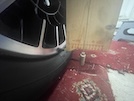
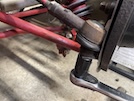
 This is where we started - the nearside top balljoint. First job is to measure the existing suspension geometry, so that I can put the new one back
in exactly the same place. First, with the car still on the ground, I measure from the centre of the balljoint, to the edge of the wishbone (where
that locknut meets the wishbone). It's 41.5 mm on the nearside, and 37.5 mm on the offside.
This is where we started - the nearside top balljoint. First job is to measure the existing suspension geometry, so that I can put the new one back
in exactly the same place. First, with the car still on the ground, I measure from the centre of the balljoint, to the edge of the wishbone (where
that locknut meets the wishbone). It's 41.5 mm on the nearside, and 37.5 mm on the offside.
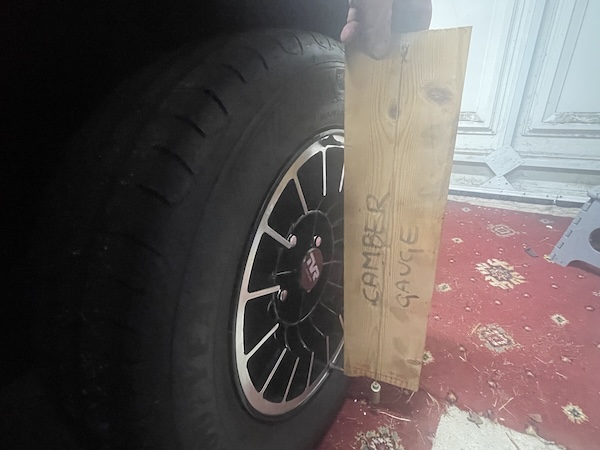
 Then I call upon my very expensive but trusty camber gauge. Longer-term readers will remember me making this for the Cerbera in November 2009 - yes
it's almost 20 years old, but is guaranteed never to go out of calibration. The Cerbera had bigger wheels though, so I have to move the top screw to
the right diameter for the Vixen's wheel rims, and then check with a spirit level that it's vertical when it says it's vertical.
Then I call upon my very expensive but trusty camber gauge. Longer-term readers will remember me making this for the Cerbera in November 2009 - yes
it's almost 20 years old, but is guaranteed never to go out of calibration. The Cerbera had bigger wheels though, so I have to move the top screw to
the right diameter for the Vixen's wheel rims, and then check with a spirit level that it's vertical when it says it's vertical.
Oh, while I'm here, let me tell you that I gave a talk to a local group on Thursday about the history of TVRs, and about my cars in particular.
Somebody asked how long a period the photos were taken over. When I said "23 years", he pointed out that the same bit of red carpet was in a lot
of them, so he thought they were all taken at the same time... "No," I said, "that's my copyright protection method." I hadn't thought of that
before, but it got a laugh.
 Anyway, it turns out that both front wheels have 1 degree of negative camber. The spec sheet says that it should have slight positive camber, but
that was based on prehistoric tyre technology, and the current recommendation seems to be for zero camber, or slight negative.
Anyway, it turns out that both front wheels have 1 degree of negative camber. The spec sheet says that it should have slight positive camber, but
that was based on prehistoric tyre technology, and the current recommendation seems to be for zero camber, or slight negative.
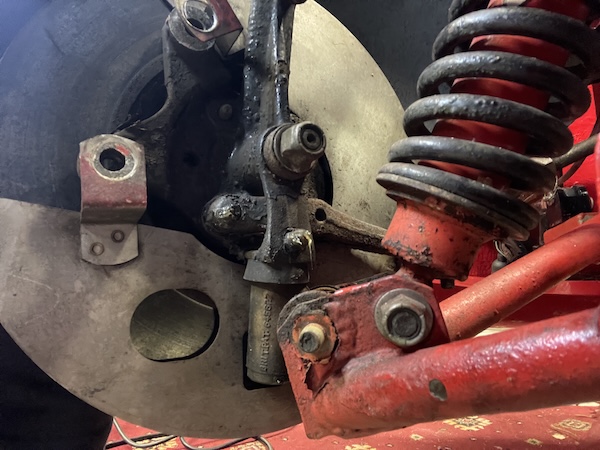
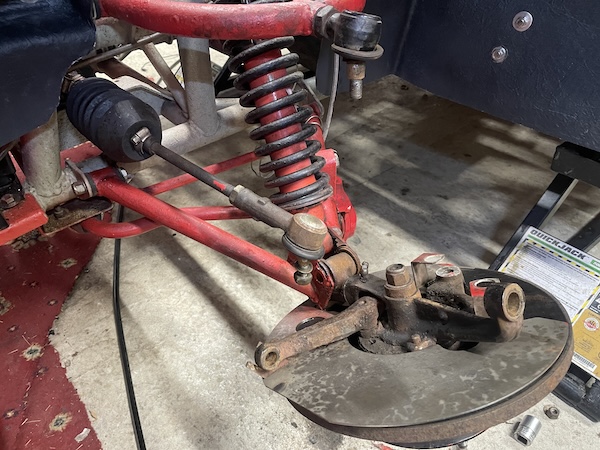
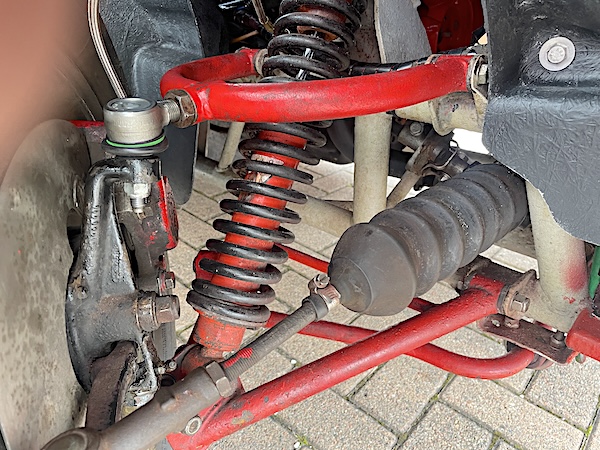
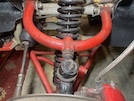
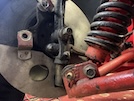
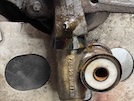
 So, lift the car and get on with the job! Here's how the trunnion fits into the bottom wishbone, and also shows the bottom of the vertical link
holding the wheel hub. This is the driver's side, but you get the idea. This one took a couple of pumps of grease last week, and you can see where
it has been squeezed out past that dust cover.
So, lift the car and get on with the job! Here's how the trunnion fits into the bottom wishbone, and also shows the bottom of the vertical link
holding the wheel hub. This is the driver's side, but you get the idea. This one took a couple of pumps of grease last week, and you can see where
it has been squeezed out past that dust cover.
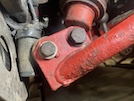
 We're going to start with the nearside though, because that's the side that was blocked and is most likely to need new parts. First step is to
remove the 2 bolts holding the brake caliper to the hub, and hang it on a bent wire from the chassis out of the way, without stretching the brake
hose.
We're going to start with the nearside though, because that's the side that was blocked and is most likely to need new parts. First step is to
remove the 2 bolts holding the brake caliper to the hub, and hang it on a bent wire from the chassis out of the way, without stretching the brake
hose.
 Then the bottom bolt holding the trunnion to the wishbone. I remove the nut but the bolt is rusted in place... I spray it with some penetrating oil
(not WD40 - that has loads of uses but it's not the best rust lubricant)) and then get a spanner on the bolt to free it. Then I put the nut back on
to protect the threads, and hammer and drift the bolt through the bush.
Then the bottom bolt holding the trunnion to the wishbone. I remove the nut but the bolt is rusted in place... I spray it with some penetrating oil
(not WD40 - that has loads of uses but it's not the best rust lubricant)) and then get a spanner on the bolt to free it. Then I put the nut back on
to protect the threads, and hammer and drift the bolt through the bush.
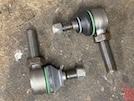
 Next is the steering arm balljoint - loosen the nut and then use a non-destructive balljoint remover to, erm... remove it.
Next, I loosen the locknut that top balljoint, before I loosen the bolt through the hub link and release the joint from the taper. Then I unscrew the
balljoint 28 turns out of the wishbone.
 Now I can swing the whole hub down and pull it free from the wishbone.
The trunnion won't come off while the brake disk and backing plate are still in place. I remove the split pin from the hub nut, and then undo the
nut and lift the hub and bearings off the axle.
 That gets me to here, where I can unscrew the trunnion from the bottom of the upright link, counting 13 full turns.
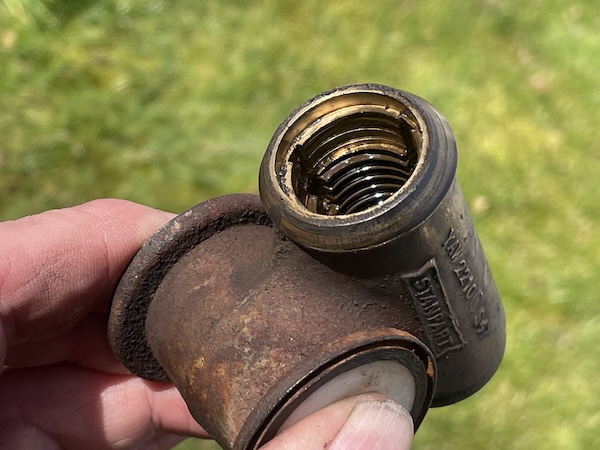
 This is the thread in the bottom of the nearside upright link...
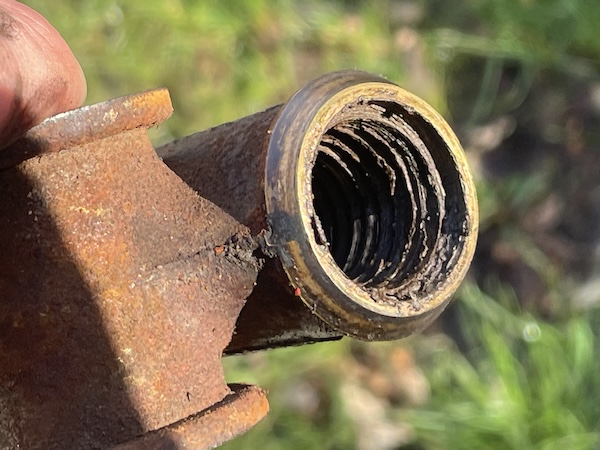
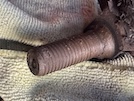
 and here's the corresponding trunnion. You can see that both are packed with dried grease.
 I clean up the inside of the trunnion with brake cleaner and WD40, and check the threads for damage...
 then I clean up the thread on the link, and check carefully for corrosion, cracks or bending damage. I remove the grease nipple and clear out the
oilway up the middle of the thread with a bit of wire and then WD40 spray, then check that with a bit of gear oil, they screw together perfectly
and smoothly, with no play. I don't think I need to replace anything on this side.
then I clean up the thread on the link, and check carefully for corrosion, cracks or bending damage. I remove the grease nipple and clear out the
oilway up the middle of the thread with a bit of wire and then WD40 spray, then check that with a bit of gear oil, they screw together perfectly
and smoothly, with no play. I don't think I need to replace anything on this side.
 Then I pour a little EP90 gear oil into the trunnion cup, fit the seal and screw it onto the vertical link. With the grease nipple removed, I
can check that the trunnion is full when oil starts coming out of the grease nipple hole as I get to 13 turns, then I put the nipple back in. It's
turning much more freely than it was when I removed it!
Then I pour a little EP90 gear oil into the trunnion cup, fit the seal and screw it onto the vertical link. With the grease nipple removed, I
can check that the trunnion is full when oil starts coming out of the grease nipple hole as I get to 13 turns, then I put the nipple back in. It's
turning much more freely than it was when I removed it!
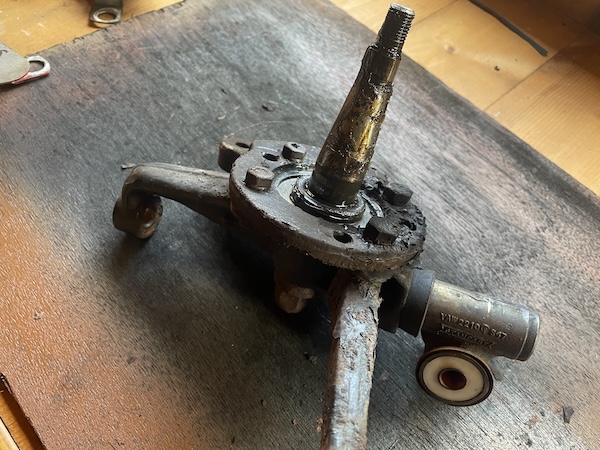
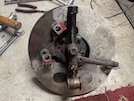 Then I can re-grease the axle spindle, refit the brake shield and the hub, then the hub nut and split pin. Here's the complete assembly ready to
go back on the car.
Then I can re-grease the axle spindle, refit the brake shield and the hub, then the hub nut and split pin. Here's the complete assembly ready to
go back on the car.
Putting it back on the car is the reverse of removal. First I locate the trunnion within the wishbone, and line up the bolt hole (which is the
tricky bit!). Then I put a little copper grease on the bolt and tap it through, and tighten up the nut. Then I reconnect the steering arm and
replace the brake caliper. I'm going to fit a new top balljoint, but they haven't arrived yet so I leave that for now.
That's one side done!
The other side turns out to be much easier, now that I have practiced on the nearside. The threads on the trunnion and the vertical link were in
much better condition, with no signs of hardened grease or corrosion. Still, I cleaned them all out and refitted with EP90 inside, as above, but
noting that the offside trunnion has a left-hand thread. Again, I don't refit the top balljoint, since I am expecting new ones on Monday.
So there we go - a greasy way to spend 4 hours on a Saturday, broken only by a trip to the local tip, and a pause for a sandwich. It's done
though, so peace of mind is restored! I doubt that the nearside trunnion would have survived the summer, packed with dried grease. I'm manky,
sore and happy!
Later on, I do a wee calculation, based on the distance between the top balljoint and the bottom trunnion pivot (250mmm), and the pitch of the
thread on the top balljoint (30 turns to turn the locknut through 42mm, so thread pitch of 1.4mm) to work out that each turn of the balljoint in the
top wishbone, adjusts the camber by around 1/3rds of a degree in or out - so 3 turns per degree. Remember that for later!
Just need those new balljoints now!
:: Tuesday, 31 March 2026 ::
So the new balljoints arrived yesterday, although I was too busy to fit them.
 First task is to fit the locknuts to the new balljoints. Don't forget this step - or you have to dismantle the thing again to fit them later!
Then I wind a balljoint into each of the upper wishbones - counting 28 turns that i counted taking the old ones out.
 Next, I check these measurements from the centre of the balljoint, to the edge of the wishbone (where the locknut would meet the wishbone),
checking that it's 41.5 mm on the nearside, and 37.5 mm on the offside, as it was when I started (or as near as I can get it, bearing in mind that
the balljoint has to point downwards, so you can only adjust by full turns, and each turn is 1.4mm, or around 1/3rd of a degree, so you can't get
it spot on.
Next, I check these measurements from the centre of the balljoint, to the edge of the wishbone (where the locknut would meet the wishbone),
checking that it's 41.5 mm on the nearside, and 37.5 mm on the offside, as it was when I started (or as near as I can get it, bearing in mind that
the balljoint has to point downwards, so you can only adjust by full turns, and each turn is 1.4mm, or around 1/3rd of a degree, so you can't get
it spot on.
 Then I tighten the nut through the top taper - enough to hold it firmly in place, but not too much in case I have to take one or both of them out
again to adjust the camber measurement with the car on the ground.
Then I tighten the nut through the top taper - enough to hold it firmly in place, but not too much in case I have to take one or both of them out
again to adjust the camber measurement with the car on the ground.
Refit the front wheels, lower the car and roll it forward and back to settle the suspension, and measure the camber angle on both sides. It turns
out to be around 0.5 degree negative on the nearside, and 1.5 degree negative on the offside.
Lift the car again, remove the wheel and disengage the offside ball joint from the top of the vertical link, and turn it inwards by 3 turns, which
I calculated the other day, to be equivalent to 1 degree. Replace the taper nut, and lower the car to check the camber again. With that now adjusted
to 0.5 degrees negaitive camber on both sides, I can turn the steering to full lock and tighten the taper nut, and also the locknut on the wishbone.
I go round and check that all of the other bolts that I loosened are fully tight.
 This is the top of the carb, where you can see the two air corrector jets in the top. There are also two main jets in the bottom of the bowl (under
those air jets) and two idle jets in the sides of the carb (not really visible in this photo). I take all of those out, noting exactly which goes
where, and their sizes.
This is the top of the carb, where you can see the two air corrector jets in the top. There are also two main jets in the bottom of the bowl (under
those air jets) and two idle jets in the sides of the carb (not really visible in this photo). I take all of those out, noting exactly which goes
where, and their sizes.
 Here's the removed jets for the primary inlet (left hand side) and secondary (right hand side).
 Then I check the float height. Here's the top of the carb upside down with the floats in place.