:: Diary - November 2025 ::
:: Saturday, 1 November 2025 ::
Officially retired yesterday! To be fair, I have been winding down for a while, and haven't done any real paid work since the middle of September,
but yesterday, it's official!
We also had our first frost of the winter on Thursday, so no TVR-playing.
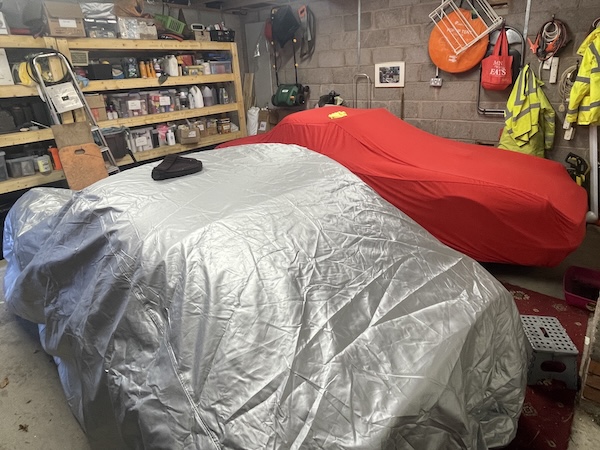
I have spent a bit of today in the garage though, just cleaning up the Vixen after it's last wet outing, and giving the S3 a wee wipe down too.
 Then winter blankets on to keep the dust off!
Tomorrow is the TVR Car Club meeting. Yesterday the weather forecast said rain. This morning it said dry. an hour later it was back to rain again.
By lunchtime it said drizzle, and now (mid-afternoon) it says dry again... Now I'm not that bothered about a wee bit of rain (if I was, I would
never risk taking the cars out at all, here in central Scotland), but it would be useful to know!
:: Sunday, 2 November 2025 ::
A quick check of the weather forecast - still says "dry all day". Not that it matters, because we've already decided to go in TVRs.
So I set off for Dave's house, with a wee stop for a fuel top-up on the way. Who's in the petrol station but Dave!
 20 years apart...
When Eric turns up, we set off on a wee run to the TVR Car Club meeting. The roads are wet, so Dave has to tip-toe so that he doesn't skate off
sideways into the scenery. We head north over the River Forth, then across towards Auchterarder. The rain that wasn't forecast, starts when we're
about an hour into the drive... Michael Fish, I hope your next shit is a hedgehog. It's not too bad though, and it's off by the time we get to the
end of our journey and park up.
Hugh's here, with lots of interesting stories about fibreglassing bonnets and door hinges and gel coats and high-build primers etc.
There's also a new guy who used to own a 60's Grantura, and is thinking about another one, or a Vixen. He has a look around mine, and a seat in it.
I don't try to sell it to him though because (a) I like it and (b) Hugh asks me about the bonnet repair, which might be off-putting.
We all enjoy a nice lunch, pausing only to admire the rain pissing down in sheets on this lovely dry day... It's still raining by the time we leave,
and as we head along the road, I start to complile my list of winter jobs:
1. Fix the wipers - they are dead slow and don't clear the screen if there's more than a gnat's spit on it;
2. seal the back window - there's still water pissing in to the boot;
3. fix the backlash in the diff;
4. See if I can track down an exhaust resonance at 2,500 to 3,000 revs; and
5. Finish tuning the carburettor - it's nearly there, but there's a slight hesitation as it comes off the idle jet and to the main jet. I need to
find somebody with a rolling road, who knows about carburettors - you can't tune them with a computer!
All in all, though, the wee car seems to be going well, it's running better than it has before, nearly everything works (including the heater /
demister!) so we're getting there!
:: Wednesday, 5 November 2025 ::
Had a day off from playing with TVRs on Monday, I had other business to attend to, preparing to wind up the company.
Yesterday, I went out to the garage, armed with my 5-item list from the other day. I start with item 4 - the exhaust resonance. I lift the car and
get underneath, and note that the exhaust mounting straps are all pretty tight, and that the rear rubber mounting is a little bit crushed and
misaligned - only slightly, but maybe enough to pass a vibration through.
That was me trying to lift the exhaust as much as possible so that it wouldn't ground so readily. I loosen the mountings and realign the exhaust
about 5mm lower (that's 1/4 inch for the old folk) just to try to reduce any vibration going through the mountings. It seems better, although I
don't take the car out, because it's absolutely bucketing down (again) and the wipers are crap.
Next - item 1, fix the wipers. The system is similar to an MGB's - motor mounted behind the glove box (in fact it looks like an MGB motor!) with
a geared cable to 2 geared wheelboxes on each wiper spindle. All up behind the dash... What happens is that the tube that the cable runs in, gums up
with old grease, or the spindles bind in the wheelboxes, or the motor itself runs out of lubrication in its internal gears.
I don't especially want to rip out the instrument panel to get to the motor and wheelboxes, so I start by removing the wiper arms and using some
spray grease on the spindle shafts. Switch on the wipers and they seem to be a bit better - but still quite slow.
At this point the wee voice on my left shoulder goes "Fuck it, it'll do".
The wee voice on my right shoulder goes "no, do it right". The wee voice reminds me that the dash top looks fecking horrible...
 Last July I decided that the interior mirror gave a great view of the front of the roll bar, but not much through the back window, so I moved the
mirror down on to the dash. That uncovered the remains of an ancient radio speaker and a big hole, that I had to cover with a made-up panel.
Last July I decided that the interior mirror gave a great view of the front of the roll bar, but not much through the back window, so I moved the
mirror down on to the dash. That uncovered the remains of an ancient radio speaker and a big hole, that I had to cover with a made-up panel.
It works, but it still looks shite.
So, says the stupid wee right-ear voice, why not remove the dash top, dig that speaker out, fill the hole properly, and re-upholster it so that
the interior looks better, AND while you're at it, take out the wiper system and clean and lubricate it thoroughly? Why not indeed?
Unlike the excellent resources available to S-Owners, I can't find a single "how-to" for removing the dash top. A couple of forum posts say "it's
easy" but don't explain exactly why... However (famous last words) - how hard can it be?
The answer is that, when the car was new or nearly-new, it probably was pretty easy- all the wee screws etc would come out with a spin of a
screwdriver.
After rusting to buggery for 50 years, it's definitely not so easy. It's a bleeding nightmare, so much so that I lost concentration and forgot to
take photos as I went along...
First, remove the centre console. Mine is held in with 2 bolts each side of the radio, and one behind the gear lever (just behind where your left
elbow sits).
Then detach the front edge of the dash top - 4 nuts and bolts along the top of the dash.
Now it starts to get more complicateder... There's a wee set screw through from the door pillar, with a nut on the back, behind the dash. You can't
reach the nut, which is rusted to shit anyway. You can't get a decent screwdriver on to the screw outside, because the door's in the way.
 So I ended up grinding the head of each screw on both sides, with a ball-grinder (caution, read the instructions first, it is NOT suitable for the
purpose stated on the box!). Removing the door seal also confirmed that my car used to be yellow!
So I ended up grinding the head of each screw on both sides, with a ball-grinder (caution, read the instructions first, it is NOT suitable for the
purpose stated on the box!). Removing the door seal also confirmed that my car used to be yellow!
 Finally (I discovered after wondering for bleeding ages why it wouldn't come out) there's 2 flat-head screws through the bulkhead under the middle
of the windscreen, again with wee rusty nuts on the rear. Fortunately, access isn't too bad so I was able to drill them out.
Finally (I discovered after wondering for bleeding ages why it wouldn't come out) there's 2 flat-head screws through the bulkhead under the middle
of the windscreen, again with wee rusty nuts on the rear. Fortunately, access isn't too bad so I was able to drill them out.
 Finally finally there's a u-clamp that holds the steering column to the bottom of the dash. I loosen that and slide it down the column.
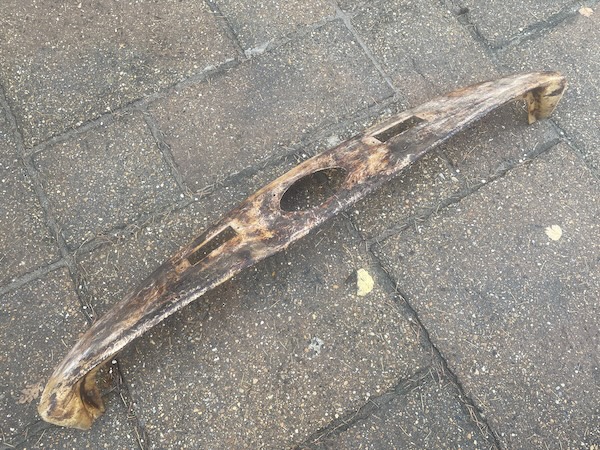
That lets me waggle, twist and cajole the dash top upwards and backwards out of the car.
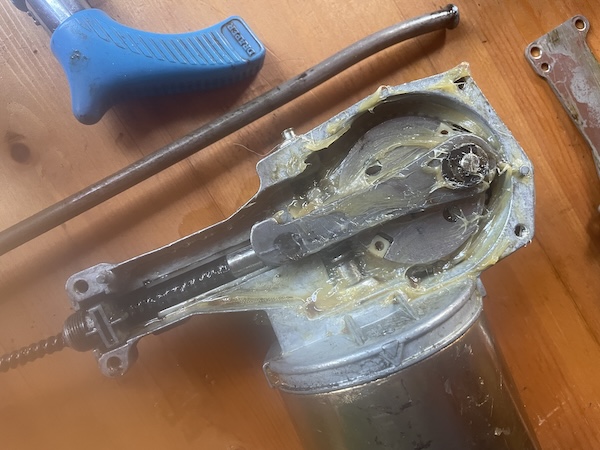
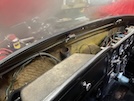 Here's the two wheel boxes on the wiper spindles - they both look very dry! I give them both a good spray inside with the spray grease, and another
test suggests that they're moving even more freely. I'll come back to those though - I've come this far, let's strip and check it all thoroughly.
Here's the two wheel boxes on the wiper spindles - they both look very dry! I give them both a good spray inside with the spray grease, and another
test suggests that they're moving even more freely. I'll come back to those though - I've come this far, let's strip and check it all thoroughly.
I also notice that there's no air hose from the heater to the windscreen vent on the driver side.
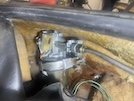
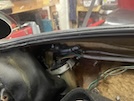 Here's the wiper motor, under the passenger side of the windscreen. It looks pretty new! You can't remove it unless you've got either an assistant,
or arms like Stretch Armstrong so you can reach both ends of the mounting bolt at the same time. I have neither, at the moment... so let's move on
to the dash top.
Here's the wiper motor, under the passenger side of the windscreen. It looks pretty new! You can't remove it unless you've got either an assistant,
or arms like Stretch Armstrong so you can reach both ends of the mounting bolt at the same time. I have neither, at the moment... so let's move on
to the dash top.
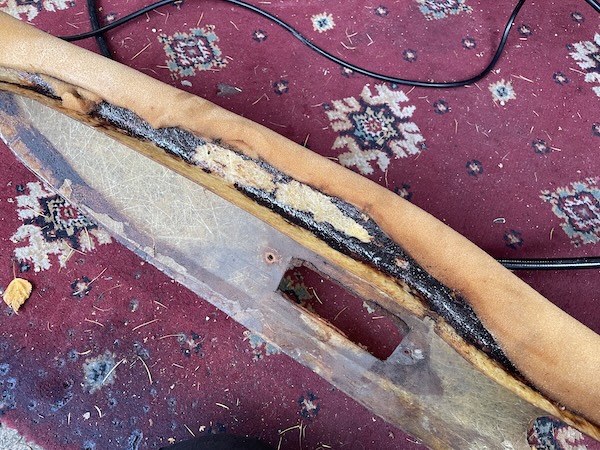
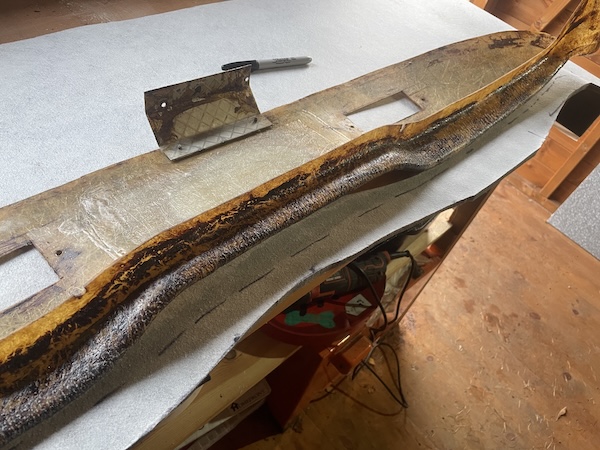
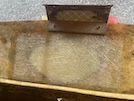
 Here's the underside of the dash top, showing the plate at the front that the two screws go through under the windscreen, and also the windscreen
heater vents. You can also see the fossilised skeleton of the ancient speaker.
Here's the underside of the dash top, showing the plate at the front that the two screws go through under the windscreen, and also the windscreen
heater vents. You can also see the fossilised skeleton of the ancient speaker.
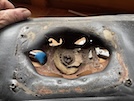 On the top side, you can see the damage caused by the speaker and old speaker grille, and then by the patch that I put over it to mount the mirror.
That all has to go!
On the top side, you can see the damage caused by the speaker and old speaker grille, and then by the patch that I put over it to mount the mirror.
That all has to go!
All of the mounting screws, for the vents and the speaker, have to be dremmeled through, because they're rusted solid.
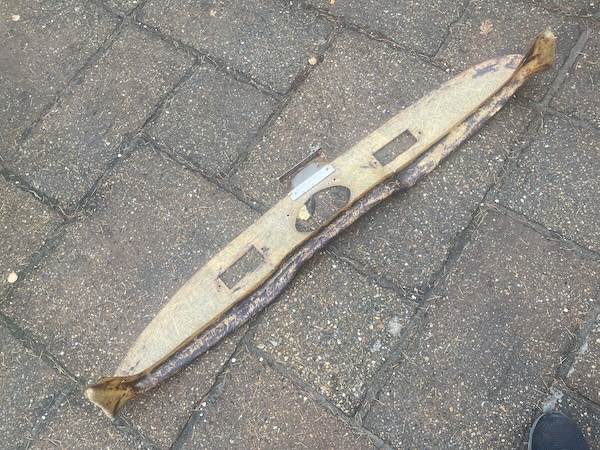
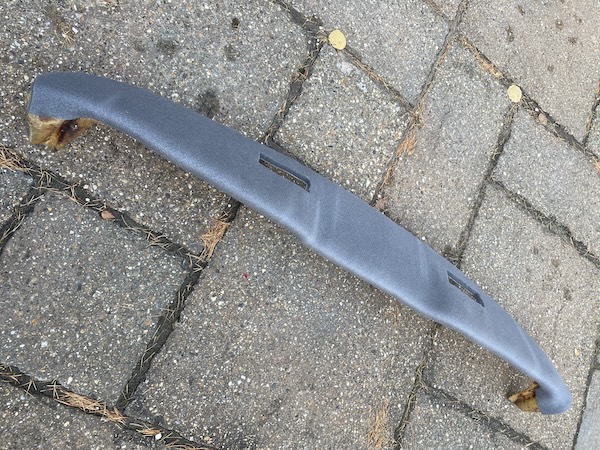
 That lets me peel the vinyl off in one piece, to use as a pattern for a new cover.
 The foam is still stuck to the panel. The panel is fibreglass, so I'll strip that foam off and repair the speaker hole with new fibreglass, then
cover in new foam.
The foam is still stuck to the panel. The panel is fibreglass, so I'll strip that foam off and repair the speaker hole with new fibreglass, then
cover in new foam.
That's enough for today! That wee bastard on my right shoulder has a lot to answer for though...
:: Friday, 7 November 2025 ::
Another lazy day off from playing with TVRs. I'm up and out the door at 5am to drive to the airport to catch a plane to Birmingham, because I'm
going to the classic car show at the NEC!
Airports get on your nerves. You have to arrive early, because you can't risk taking ages to get through security, so I'm there by 5:30, for a
flight at 6:55. Security is nearly empty, so I end up with over an hour to waste before the plane goes. I have a wee wander about to play the
"spot the classic car geek who's hanging around waiting for the same plane as me. Don't ask me how you recognise them, you just do...
Anyway, I recognise one particular one who almost walks past me - it's Dave! He says "I come away on my own for a day of peace, wandering about on
my own, and who do I bump into?" I say "is there an echo in here?" Anyway, we sit and blether until irt's time to board, although his seat is 10
rows behind mine.
We meet up again for the wee shuttle trip down to the NEC, and have breakfast while we wait for the show to open. We agree that we're still going
to wander ourselves, but we'll meet for lunch.
Then we meet another local TVR member, Ron, and a couple of his pals.
We get in the show, Dave goes right and I go left, and after about 10 minutes, I bump into Simon, the other reader of this web site, and his son
Jake.
I end up taking 50-odd photos on the day, although I'm not going to show them all here. Here's a few highlights (in no particular order except, more
or less, the order that I took them in!)
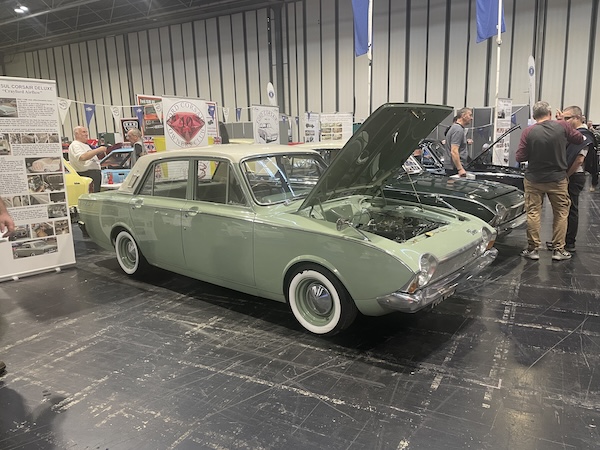
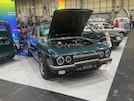
 Lotus Sunbeam - I've always liked these. I remember a few years ago you could pick up one of these relatively cheap, but prices have gone through
the roof. Not mental like Mk1 Escorts, but still a lot!
Lotus Sunbeam - I've always liked these. I remember a few years ago you could pick up one of these relatively cheap, but prices have gone through
the roof. Not mental like Mk1 Escorts, but still a lot!
 This Alvis caught my eye...
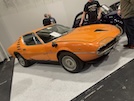 and this - it's an Alfa Romeo Montreal, and I remember drawing one for a competition when they were new, when I was about 15. I think I might still
have that drawing somewhere...
and this - it's an Alfa Romeo Montreal, and I remember drawing one for a competition when they were new, when I was about 15. I think I might still
have that drawing somewhere...
 This is a Bristol 450, which won its class at Le Mans in 1954 and 1955. They only built a few, and only this one still survives.
 I noticed its gear linkage - a handy solution when the gear lever doesn't quite line up with the hole in the floor (or the length of a driver's arm).
 I chatted for ages with the owner of this Bristol 411 - it's his dream car and he bought it when he retired. It's lovely! I would do the same, but
my list of "dream cars" exceeds the capacity of my garage, and in any case, changes regulatly depending on what I see.
I chatted for ages with the owner of this Bristol 411 - it's his dream car and he bought it when he retired. It's lovely! I would do the same, but
my list of "dream cars" exceeds the capacity of my garage, and in any case, changes regulatly depending on what I see.
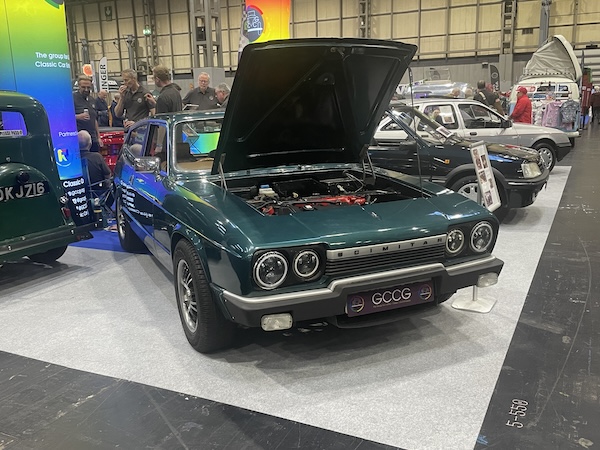
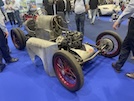
 And so to the TVR stand, starting with this lovely Grantura - the last one made - and behind it, a lime green Tuscan V6.
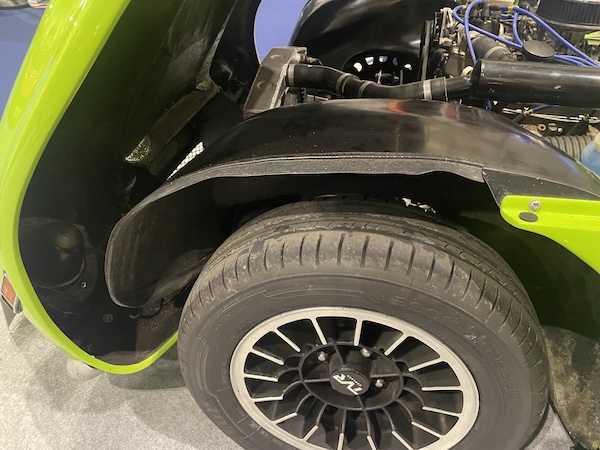
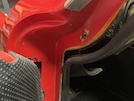
 I notice that the front inner wheelarch continues right round, and down in front of the wheel... That Grantura's is the same.
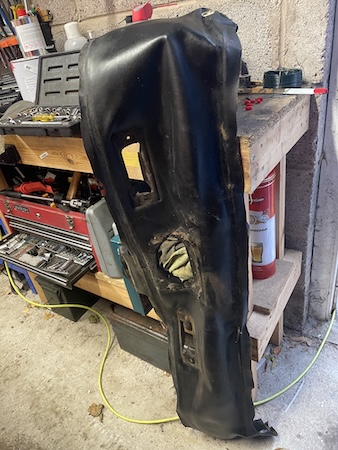
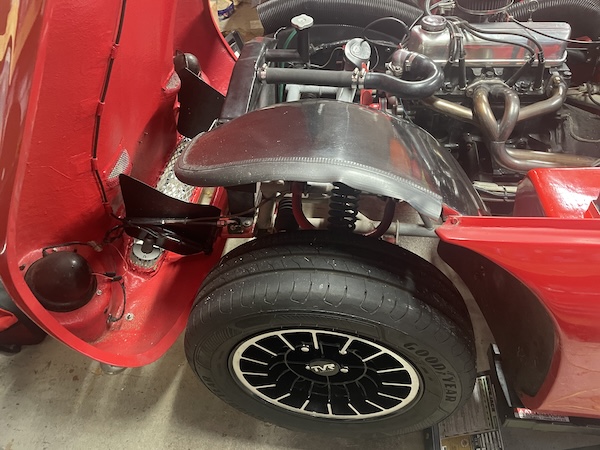
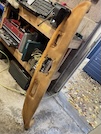
 Here's a photo of mine, where you can see that it's cut short, above the wheel. As a result, the underside of the bonnet and the back of the headlights
(and the wiring) get covered in shit when you're driving. I was thinking about how to rectify that, so I'll have to look into those.
Here's a photo of mine, where you can see that it's cut short, above the wheel. As a result, the underside of the bonnet and the back of the headlights
(and the wiring) get covered in shit when you're driving. I was thinking about how to rectify that, so I'll have to look into those.
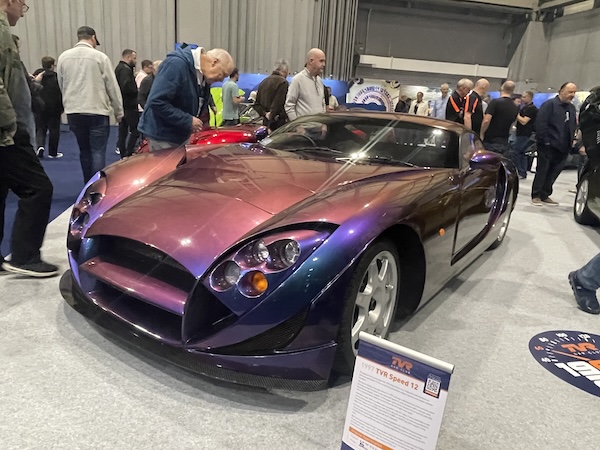
 Back to the TVR stand, and there's a Speed 12, one of only two ever produced. This one is currentky being rebuilt to join the other one as a
road-going vehicle.
Back to the TVR stand, and there's a Speed 12, one of only two ever produced. This one is currentky being rebuilt to join the other one as a
road-going vehicle.
 This is a T440 - again only 2 were ever made.
 And last, this Tuscan in an amazing paint finish!
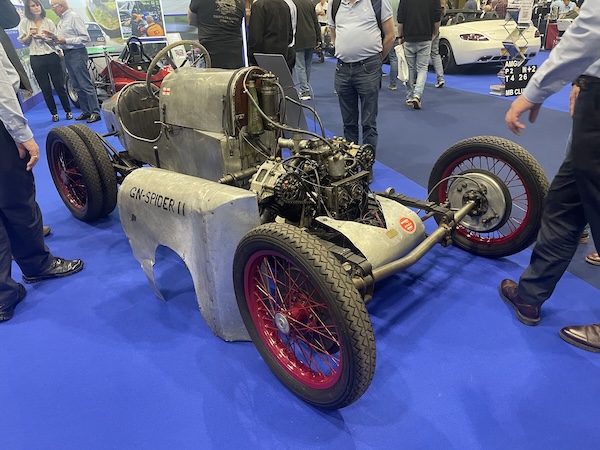
 Moving on, this is a 1920s GN Spider, still used in hillclimbs etc. You want patina? This has it in buckets. Personally, I would rather see this,
than a polished "garage queen" that is never used, that only clocks up enough miles to get to the MOT station and back, once a year (providing that
the weather is guaranteed to be dry).
Moving on, this is a 1920s GN Spider, still used in hillclimbs etc. You want patina? This has it in buckets. Personally, I would rather see this,
than a polished "garage queen" that is never used, that only clocks up enough miles to get to the MOT station and back, once a year (providing that
the weather is guaranteed to be dry).
 We're the Sweeney son, and we haven't had our dinner!
 This is a Reliant Scimitar body, on a diesel Fiat Multipla!
 I passed my test in 1976 in one of these, in exactly this colour!
 And I nearly lost my legs in one of these in the same year! It was my pal's, it was shit brown, and I was in the back when he drove into the back of
a black cab outside the Dick Vet in Edinburgh. The cab stopped for an amber traffic light - I mean, who would have expected that?
And I nearly lost my legs in one of these in the same year! It was my pal's, it was shit brown, and I was in the back when he drove into the back of
a black cab outside the Dick Vet in Edinburgh. The cab stopped for an amber traffic light - I mean, who would have expected that?
Anyway, car hits taxi, young lady in front passenger seat hits windscreen (this was in the days before compulsory seat belts), seat lifts to hit
her in the arse, I slide forward off the vinyl back seat, front seat comes down across my knees, she drops back down onto the front seat, and jumps up
and down because she can't get out until I get out, except I certainly can't move until she gets off the seat!
Our car's a write-off, the taxi has a teeny wee dent in the bootlid, she has a black eye and a bump on her head, my pal the driver is ok except for
the shit stains, and I can hardly stand or walk...
Ah, the memories that classic cars can bring...
It's all too emotional, so after lunch with Dave, I head for the trade stalls and the autojumble. I do love a good rummage!
I'm looking for M4 and M5 setscrews to put the Vixen's dash back in - preferably stainless steel in case I have to take it out again in the next
50 years. I find those on a stall - £4.00 well spent!
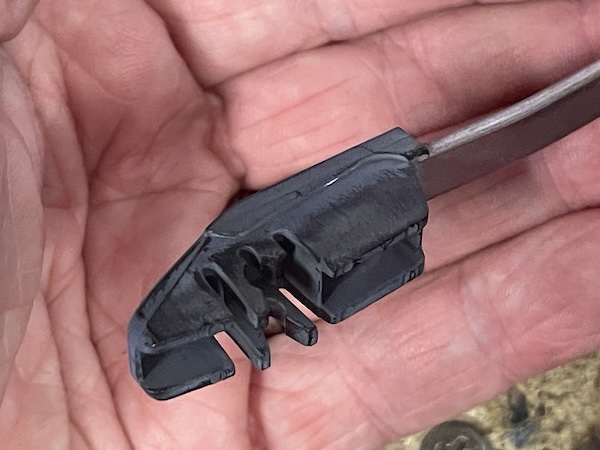
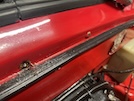
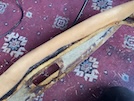
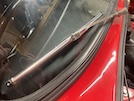
 I'm also looking to fix one of the Vixen's wiper blades - as you can see here, the blade fits into a wee clip adapter on the end of the wiper arm.
One of the clips is broken, so the blade attaches, but it's not very secure. I remember wheen you bought wiper blades, they came eith a wee box of
plastic adapters, and I'm sure this is one of those. I don't know if you can buy those shitty wee adapters any more.
I'm also looking to fix one of the Vixen's wiper blades - as you can see here, the blade fits into a wee clip adapter on the end of the wiper arm.
One of the clips is broken, so the blade attaches, but it's not very secure. I remember wheen you bought wiper blades, they came eith a wee box of
plastic adapters, and I'm sure this is one of those. I don't know if you can buy those shitty wee adapters any more.
The Vixen's wiper arms are apparently off a Triumph Spitfire, and bit of research at the Triumph displays suggests they're right, but the arms come
in two sizes (widths) so I need to check mine when I get home, then pull off those adapters and fit proper chrome blades.
I also find a stand selling Weber carburettors. No, I'm not buying twin 40 DCOEs, but a wee box of idle jets, main jets and progression jets, so
that I can try to tune the car's fuel mix at idle and low throttle.
 The place is now packed, and you can hardly move for other people who can hardly move. I accept this with calm and serenity - I'm in no hurry.
However, there is a special place in hell reserved for a new breed of people wandering through a heaving crowd, towing one of these garden carts
full of all the shite they have purchased.
The place is now packed, and you can hardly move for other people who can hardly move. I accept this with calm and serenity - I'm in no hurry.
However, there is a special place in hell reserved for a new breed of people wandering through a heaving crowd, towing one of these garden carts
full of all the shite they have purchased.
Somewhere along the way, I pass the Lancaster Insurance stand, where Mike Brewer, the Wheeler-Dealer, is holding court. I don't even break step as
I wend through the excited fandom. I'm sure he's a nice person and all, but his knowledge of cars and how to sell them is... erm... limited.
When I get near the far corner of Hall 5, I can hear the announcer closing an interview with somebody, but can't hear who. As I get closer, there's
a huge crowd around the Drivetribe stand, with smart phones held high, trying to take photos past other smart phones held high. The photographic
subject is hidden within this crowd, but I discover that it's Richard Hammond, he of Top Gear fame. Again, I don't even break step as I wend through
the excited fandom.
I have to leave the show at 4.30 because I'm getting a plane at just before 6. Dave's not flying until later so he's having his dinner first. I
stagger up to the wee shuttle train, and then stumble through the airport to security, where the queue goes to and fro between the wee zig-zag
tapes for bleeding miles - good job I left early!
Then I have to walk / stumble / crawl feckin miles to the far end of the airport, through the asphyxiating perfume departments of duty free. I end
up following a woman with her "hand luggage" in one of those carts - 2 or 3 cases, several plastic carrier bags full of stuff, and a choice of coats
/ jackets. She must have chartered a whole cargo plane to shift that lot home - it's certainly more than my meagre baggage allowance.
When I eventually reach the gate, I have time for a wee toastie before boarding, then home!
I've done 19,000 steps today, which equates to around 8 miles at my short-arsed walking stride. My feet are ok but my ankles are killing me...
Brilliant day though!
:: Saturday, 8 November 2025 ::
Up bright and early today - but not as early as yesterday. As soon as my feet hit the floor, I realise that my legs feel like I've just emerged
from the back seat of a Mini that's just walloped a black taxi up the luggage nearly 50 years ago. Everything hurts...
I'm a brave / stupid wee git though, so it's out to the gitcave!
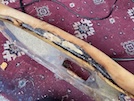
First step is to check these wiper arms. I pull off the wee plastic adapter thingy, to show the original push-on fitting. Then I measure the arm
and also the splines on the shaft - right I know what arms / blades I need!
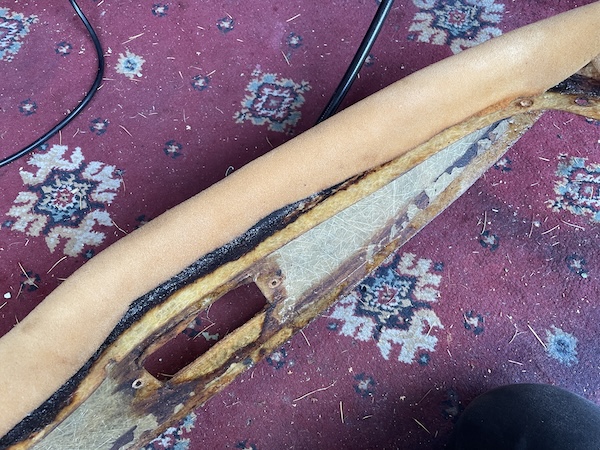
 Then it's on to the dash top. I take loads of record photos to show exactly how the foam is cut and fitted around the edges, including the roll-over
at the rear edge. I'm not going to show them all, but this one shows the underside of that back edge.
Then it's on to the dash top. I take loads of record photos to show exactly how the foam is cut and fitted around the edges, including the roll-over
at the rear edge. I'm not going to show them all, but this one shows the underside of that back edge.
 It seems to be stuck down with some kind of black resin, rather than glue. The Egyptians used a similar resin to embalm dead Pharoahs, and those
;lasted 5,000 years, so TVR were obviously not taking any chances!
It seems to be stuck down with some kind of black resin, rather than glue. The Egyptians used a similar resin to embalm dead Pharoahs, and those
;lasted 5,000 years, so TVR were obviously not taking any chances!
 However, the foam pulls off (mostly) in one piece, leaving a black crusty residue on the panel, It's a mix of glue and a thin layer of foam
particles.
However, the foam pulls off (mostly) in one piece, leaving a black crusty residue on the panel, It's a mix of glue and a thin layer of foam
particles.
 I scrape the worst of it off with a palette knife, and then sand it all over to get all the old adhesive off, with particular attention to the
edges where the vinyl has to stick.
I scrape the worst of it off with a palette knife, and then sand it all over to get all the old adhesive off, with particular attention to the
edges where the vinyl has to stick.
 Then I clean it all with acetone to remove the dust and any remaining glue bits.
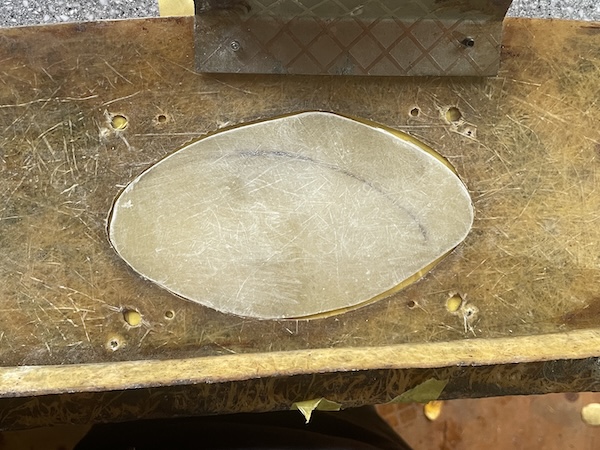
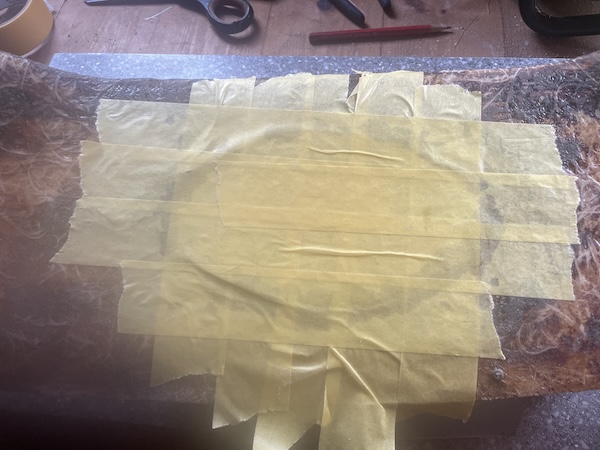
 Before I re-cover it, I have to make a wee patch panel to fill in that speaker hole and all those screw holes. I check that this area of the dash is
flat, then I mark it out on the corner of my old kitchen worktop, then wax that up (as a release agen) and lay down a couple of layers of glass
fibre. I need to leave that to set, then glass it in place!
Before I re-cover it, I have to make a wee patch panel to fill in that speaker hole and all those screw holes. I check that this area of the dash is
flat, then I mark it out on the corner of my old kitchen worktop, then wax that up (as a release agen) and lay down a couple of layers of glass
fibre. I need to leave that to set, then glass it in place!
:: Sunday, 9 November 2025 ::
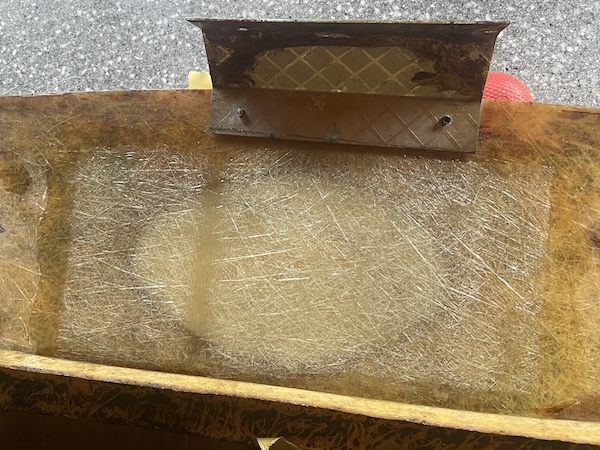
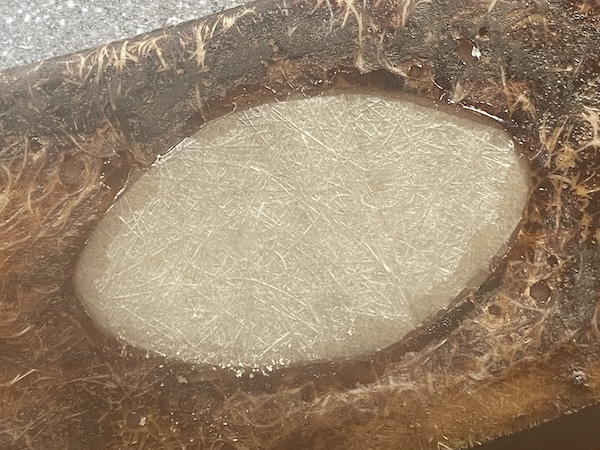
First task today is to lift the new fibreglass panel off the waxed board with a pallette knife. Then I hold it against the speaker hole, and mark
the shape of the hole with a pencil.
 Then I cut the fibreglass to the shape of the hole (near enough).
 I hold the repair patch in place with a couple of layers of masking tape on its top side, making sure that I've got it more or less flat with the
surrounding panel...
I hold the repair patch in place with a couple of layers of masking tape on its top side, making sure that I've got it more or less flat with the
surrounding panel...
 before I glass it in with a couple of layers of mat...
 and after about 30 minutes, it has set hard enough to remove the masking tape. I'll leave it to cure properly before I sand it and maybe add a wee
bit filler if necessary.
and after about 30 minutes, it has set hard enough to remove the masking tape. I'll leave it to cure properly before I sand it and maybe add a wee
bit filler if necessary.
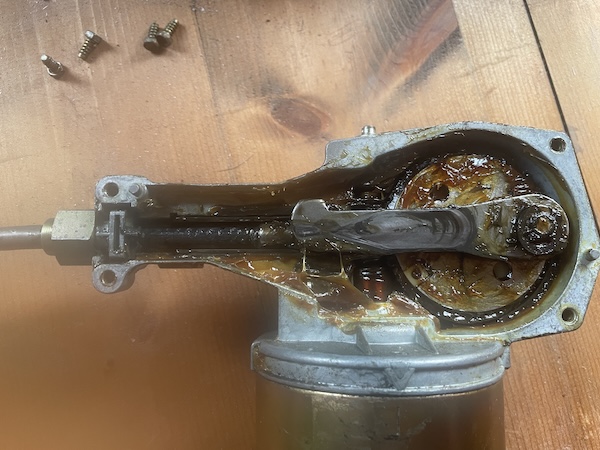
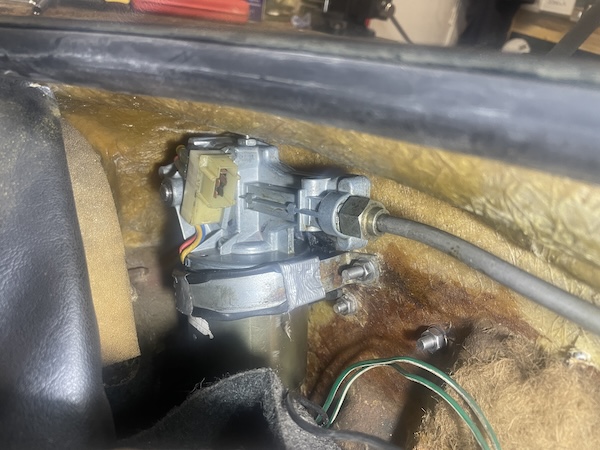
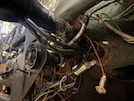
Meanwhile, back to the wiper motor. First I remove the spindle nuts and washers from the scuttle panel. Then I've devised a contortionist method
for getting the two motor mounting bolts out on my own. It works, but I won't be able to get them back in that way! Then I have to disconnect an
earth wire from the motor casing, and it's out!
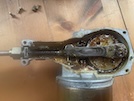
 Here's the wiper assembly out on the bench. As you can see, it all looks pretty clean.
 I remove the 4 screws holding the cover, and see that the mechanism is well packed with grease, although it's a wee bit hard if you ask me. To clean
it out, I remove that circlip on the end of the arm on the right, and then remove the wee washer. That lets me lift that wee arm off the wheel spindle
and out of the cable end.
I remove the 4 screws holding the cover, and see that the mechanism is well packed with grease, although it's a wee bit hard if you ask me. To clean
it out, I remove that circlip on the end of the arm on the right, and then remove the wee washer. That lets me lift that wee arm off the wheel spindle
and out of the cable end.
Then I remove that big nut on the end of the metal pipe, and lift the cable out of the motor casing.
Then I can pull the inner cable out of the metal pipe, which turns the wiper spindles as it pulls out. It feels pretty tight to pull.
I clean the old grease out of the motor, and pack in some new grease - not too much though!
Then I spray cleaner along the inside of the pipe, and use the airline to try to blow any shit out.
 Finally, I clean and re-grease the inner cable, and re-attach it to the motor wheel. Then I re-install it through the pipe and spindles (it seems to
move much easier!) before attaching the motor cover.
Finally, I clean and re-grease the inner cable, and re-attach it to the motor wheel. Then I re-install it through the pipe and spindles (it seems to
move much easier!) before attaching the motor cover.
That's all I can do for now. I'm going on holiday for a week, so putting this all back together will have to wait till I'm back.
:: Wednesday, 12 November 2025 ::
I’m on holiday, so no TVR progress. I thought that I would tell you about a wee incident that happened today though.
I drove from our holiday accommodation for a day, to a place that I had better not name, because it was a shitehole. I didn’t know that before I
went there, though, obviously! Anyway, I was parallel parking the Range Rover into a space that wasn’t a lot longer than the car - it was the last
space available after 2 laps though, so it was that our nothing.
After a triple-shunt (back in, forward a wee bit, back, forward, back) I was in. As I was getting out of the car, 2 things happen: the car in front
moves forward 3 feet, 2 minutes too late; and this young lad appears, “You just crashed into my car!” (the one behind).
“Don’t think so.”
“Yes you did, I was sitting in it and I felt it!”
Fuck’s sake… ok let’s have a look…
The cars are about 2 feet apart, he’s busy rubbing his fingers along the front grille and numberplate, then he says “look at these marks”.
“Yes that was your fingers…”
“No that’s where your bumper has rubbed the dirt off.”
Me: “Look at the back of my bumper - it’s covered in about 3,000 miles of winter shite, and there isn’t a single mark on it - that hasn’t touched
anything.”
Pause... Him: “Look, that number plate screw is cracked.”
There’s a crack in one of the white plastic caps on a number plate screw…
Me “Look, there’s dirt in that crack, that hasn’t just happened.”
Pause... Him “You crashed into my car!”
“Show me the damage.”
“Well…” he says, “I can’t see any…”
“No - so what do you want me to do?”
“I… well… but you crashed into my car!”
“No I didn’t, but even if I did, what do you want me to do?
Pause...“Erm, no, ok, erm…”
Then he asks me to move my car forward a wee bit so that he’ll be able to get out. I point out that he wasn’t over-keen to move his to help me get
parked, but I’m not a dick, so ok.
It’s all great fun, eh?
Meanwhile, I’ve looked up the correct chrome wiper blades for the Vixen, and I’ll get those ordered when I get back home from holiday.
:: Sunday, 16 November 2025 ::
About 200 years ago, they introduced a new form of opunishment into UK prisons - the treadmill. The idea was to just wear prisoners out through
continuous pointless exercise, so you are made to work all day, and at the end of it, you're absolutely knackered, but you've achieved absoluteky
nothing worthwhile.
That was my Friday and Saturday. I went out to get on with re-covering the dash top, and refit the wiper mechanism, but instead, my attention was
grabbed by a wee maplight in the corner of the dash, that doesn't work. I take it out of the dash while it's easily accessible, and start diagnosing
power supply and earth etc, and eventually, what's left of my age-raddled brain deduces that the wee separate switch in the dash doesn't work. I have
another switch so I replace that.
Right, back to the dash. Then I notice that the bolt that holds the centre console to the floor is loose. I get a couple of spanners and tighten that.
Right, back to the dash. Oh wait, let's tidy up some of these tools first.
Right, back to the dash. Oh wait, let's order these wiper blades - Triumph Spitfire, but 2 widths of arm, a measurement shows mine are 7.2mm... done!
Right, back to the dash. Naaah, can't be arsed...
So that was Friday and Saturday!
Today dawns bright and bloody freezing cold. Right, get off the pointless treadmill and back to the dash!
I forgot to say that before I went on holiday, I bought a sheet of upholstery foam and a bit of vinyl, from a local company who trim car and van
seats. Cost me £20!
 First I lay out my foam sheet, then mark out the shape of the back of the panel (the rolled edge that faces the driver). Then I cut the foam an inch
and a bit (precise measurement matters!) outside those marks.
First I lay out my foam sheet, then mark out the shape of the back of the panel (the rolled edge that faces the driver). Then I cut the foam an inch
and a bit (precise measurement matters!) outside those marks.
Then I stick down that rolled edge first, with contact spray glue. Then I turn the panel over, and spray the top of the panel and the underside of
the foam, and stick that down.
Then I trim the front edge (the bit that goes against the windscreen) flush with the edge of the panel - I don't want that to be too thick and
not going into place properly.
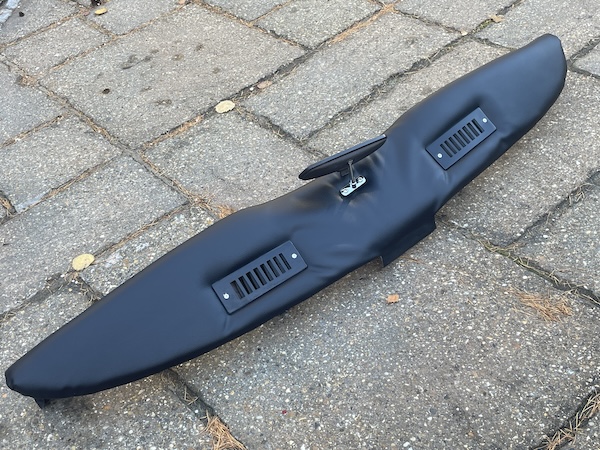
 Here's the panel with its foam backing stuck on, and holes for the screen demisters.
Now the vinyl. I start by trimming that and sticking it along the edge that will be under the windscreen - it's a fairly simple fold-over and stick.
Then I mark out the edge of the rear of the dash, and cut a good 2 inches outside those marks, to allow the vinyl to go round the foam roll, stick
to the flange, and then fold over the back of that flange. I stretch it back and push it right into the angle of the flange with a plastic scraper,
and work my way from the centre outwards in both directions. Because the dash has two "high bits" at the end and a lower bit in the middle, it's
very difficult to eliminate all the creases.
Then I drill holes for the windscreen demister vents, and mount those with new screws.
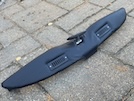
 It's not perfect, but it's not too bad either, and it's certainly a lot better than the butchered mess that I started with!
I've just remembered - I also need to mount the rear-view mirror in the middle, before I put it back in - that might take out some of the creases
(or add new ones!).
:: Monday, 17 November 2025 ::
Another frustrating day of "2 steps forward, one step back"...
 First the easy bit - I fit the mirror to the dash top. Pretty simple - hold it in place, drill 2 holes, insert 2 big self-tappers, job done!
Then on to re-installing the wiper motor and mechanism. The 2 bolts for the motor need you to be able to access the bolt on one side of the firewall,
and the nut on the other side, at the same time, while holding the motor and its bracket in place with your third hand... First step is to insert
the bolts through the bulkhead, and tape them into place.
Then I fit the earth wire to the motor body, and insert the motor and mechanism behind the dash, and install the spindle nuts to hold it in place.
Then I prop the motor into position with a bit of wood, and get one of the bracket nuts on. I can't get the other one on though - tere's not enough
space for even my wee girly hands, between the motor and the dash and the side of the footwell.
Take it all out again, including the spindles, and start by installing the lower bracket nut loosely, then the motor, swinging the bracket into place
under it. Prop it in place with the bit of wood, and get the second nut on. There's a rubber pad to be sandwiched between the motor and the bulkhead,
then I wedge a wee spanner on the nut, and tighten up the upper bolt first, then the same for the lower mounting bolt.
 Then I install the wiper spindles for the second time, befor I plug in the wiring loom and test that it all works.
I should have mentioned that it's bloody freezing again, and I have a heater on an extension lead, blowing near where I am working. Well, I had -
at this point I realise that it has switched itself off. I move the heater to a direct socket and it works - I realise that the extension lead's
cut-out has... em.. cut out. And the cable's warm. I unwind the cable totally from the reel, and the inside coils are even warmer!. Schoolboy error!
With the extension lead cooled and the cut-off reset, I start to install the dash. I can't get it into place though - the wiper mechanism is in
the way! There's a wee plate with 2 holes, in the very front of the dash top (under the windscreen) and it won't fit over the wiper spindle
mechanism, it has to go in and up.. bugger, bugger and thrice bugger. I take the spindles back out, but then I still can't align the holes in that
plate with the holes in the car body.
I get 2 new bolts and tape them into position from the outside. This is where I realise that the holes in the plate are M4 (or a slightly smaller
imperial size) and my bolts are M5. Did I mention "bugger"?
I take the dash back out and drill the holes in the plate out to 5mm. Then I fit the two wee bolts into the holes in the scuttle, and tape them in
place. Then I can wiggle the dash back in, and I can just see enough to be able to get those wee bolts through the holes in the metal plate, and
fit a washer and nut by feel - you can't see a bloody thing, and you need an extra elbow in the middle of your forearm to even reach...
I don't have time this morning to finish dash installation, so that will have to do for today.
:: Thursday, 20 November 2025 ::
I've been running around trying to organise closing my company and its bank accounts, and getting final bills paid. All sorted now!
But today, it's back to installing the dash top. First I need to finish tightening the wee nuts on the dash top. I wedge a wee ring spannewr on to
each nut, while I tighten the screw from the outside.
 Then I manage to manouevre the wiper spindles back up through the scuttle, and fit the spindle nuts.
Next, I loosely fit the 4 bolts across the top of the dash. They push through from behind, with a washer and cap nut on the front.
 These two screws fit through from the door frame, through the covering for the pillat and then through the ends of the dash top. Tghis turns out to
be fiddlier than Jimmy Carr's accounts, but I get them in eventually and get a wee nut on the back.
These two screws fit through from the door frame, through the covering for the pillat and then through the ends of the dash top. Tghis turns out to
be fiddlier than Jimmy Carr's accounts, but I get them in eventually and get a wee nut on the back.
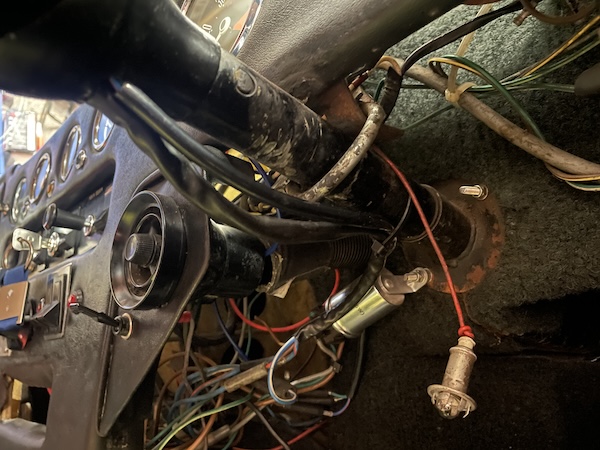
Then I can tighten all those nuts up, taking care not to pull on any of the wiring up behind the dash.
 Before I fit the centre console, I decide to check that everything on the dash still works. Lights, wipers, fuel guages etc all appear to be ok.
I can't check the temp and oil gauge untik the engine is running - but it won't start! It's zero degrees in my garage (despite the space heater on
full blast) and it has sat for a while, so the battery just doesnt have enough oomph!
Before I fit the centre console, I decide to check that everything on the dash still works. Lights, wipers, fuel guages etc all appear to be ok.
I can't check the temp and oil gauge untik the engine is running - but it won't start! It's zero degrees in my garage (despite the space heater on
full blast) and it has sat for a while, so the battery just doesnt have enough oomph!
I stick it on a trickle charger, and decide to fit the centre console anyway... except the bottom of the dash is misaligned by about 5mm to the
right, so the console bolts won't go through... I loosen all the bolts around the dash, and manage to shift it over slightly until it lines up.
 Then I can install the centre console, and re-tighten all of the bolts around the top edge. Finally, I fit the u-clamp fixing the bottom of the dash
to the steering column. That looks not too bad!
Then I can install the centre console, and re-tighten all of the bolts around the top edge. Finally, I fit the u-clamp fixing the bottom of the dash
to the steering column. That looks not too bad!
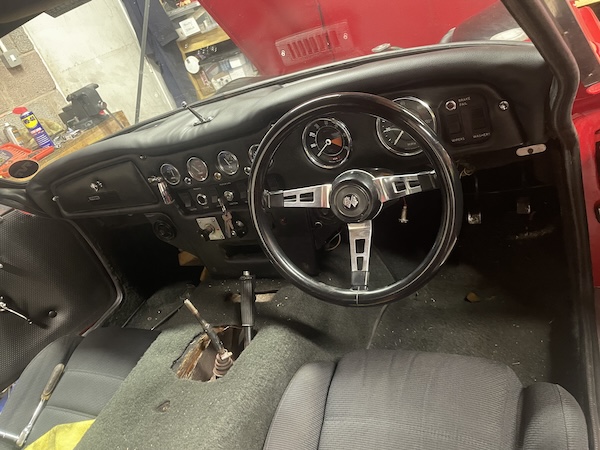
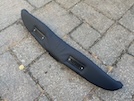
It certainly looks better than this! (but is it several days of effort better?)
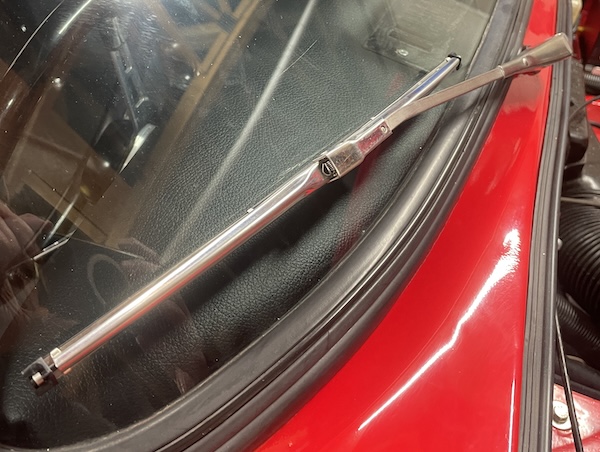
 While I was in the middle of all this, the new wiper blades were delivered. They look much better, and fit the wiper arms properly!
I saw this on another forum yesterday - just about sums up how I feel!

:: Saturday, 22 November 2025 ::
Let's talk about starters. They set you up perfectly for a nice meal, and come in various shapes and sizes. Soups, chicken wings, spring rolls,
bhajis, nachos - even prawn cocktail at a pinch (although personally I wouldnt have prawn cocktail even if I had pinched it).
Now let's talk about non-starters. The list is much shorter: TVR Vixens. Well, mine at least. I've been trying to start the wee cow since Wednesday
and it's been on a trickle charger for the last 3 days. I've also charged up one of those wee booster packs for a little extra boot up the arse.
The weather is a wee bit milder today (6 degrees as opposed to minus 2) so with everything connected up, let's get busy! It cranks over really
slowly, but jumps into life on the third try! With a bit of twiddling of the manual choke (a skill lost to current drivers of auto-everything
computer-managed shitboxes) I can leave it to idle for a bit.
All the gauges seem to be working - the ammeter flicks when you put lights on and off, the fuel and oil pressure gauges are normal, and the engine
temperature gauge soon climbs to normal. All the switches work, the panel lights are all good, all the warning lights work - even the wee map light
now works (and it didn't before - I found a duff earth when I had the dash out).
So all that's left to do is to tidy the garage. I've explained before that I'm a messy worker, I end up surrounded by piles of tools that I've been
using, and they all have to be put away at the end. While I'm doing that, I remember that the power cord on my drill is damaged and repaired
"temporarily" (since 2022 when I fitted the power steering to the S). I have a good length of orange lawn mower flex, so I chop a bit off, take the
drill apart and make a new power flex.
While I've got that orange flex in my hand, I decide to fit a new flex to the angle grinder - it's not damaged but it's very short and doesn't reach
an extension lead on the floor, if you're standing up.
On to the next job! Maybe in a few days / weeks / months eh?
:: Tuesday, 25 November 2025 ::
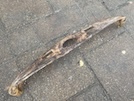
Remember when I was at the Classic Car Show 3 weeks ago, and was talking about front inner wheelarches? Mo? Well go back and look again because I'm
not digging the photos out again. Basically, though, the front inner arches I saw on the Vixen and Granturs go right round the top of the tyre,
down to the lower edge of the bonnet. It looks as if mine have been cut short for some reason, and stop just above the front of the tyre. As a
result, there's a big gap at the froint for all kinds of shit to go through, and batter against the back of the lights etc, and the underside of
the bonnet. Mine is already manky, with lots of wee gritty stones rattling about when you open and shut it.
I only need one decent sized stone to get thrown up, and I'll have a star crack in thee bonnet...
One of the owners there, gave me a contact number for a guy who makes those inner arches, so I finally got round to calling him yesterday. After a
bit of measuring, he agreed that mine have been cut back, and said he can make me a pair of arches that will solve the problem.
It also turned out that he made the bonnet that I fitted, although it was bought elsewhere.
So, new arches ordered, now being made, watch this space!
I also need to move the S out of the garage, to get at some stuff that's at the back of the garage. I'm ashamed to admit that it seems as if I
haven't used it since July - the receipt for the MOT is still lying on the front seat... Must rectify next year, now that I'm retired!
:: Friday, 28 November 2025 ::
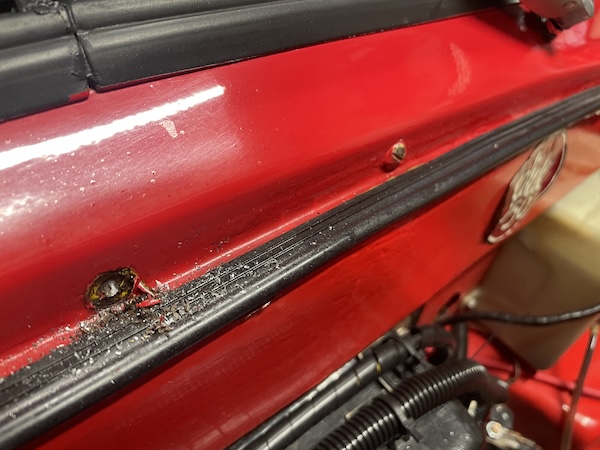
While I'm waiting for the inner wheelarches, it's time to turn attention to a long-staanding problem - the rear window leaks! I've noticed it
before, and the paintshop also said that they left the car outside one day and water got into the boot area, and he tried to seal it.
Didn't work though - the boot was wet on our Yorkshire tour on the days that it rained, and even just coming back from the monthly club meeting a
few weeks ago, there was a afor bit of water coming in. So today, let's get all diagnostic!
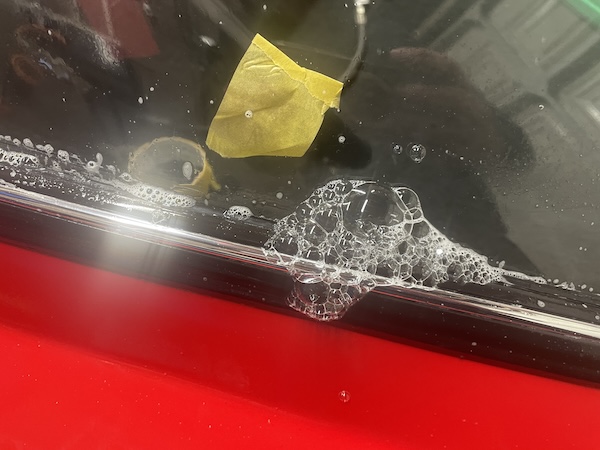
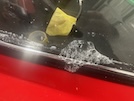
First, I spray around the window with really soapy water (that I mixed up ages ago to track down a puncture). Then I fire up the compressor and get
inside with the airline, aiming it around the edge of the window, all the way round. That highlights a leak in each of the top front corners, more
leaks (of about 3 inches each) in each bottom edge, and a bit in the centre of the back bottom edge.
With those locations marked up, I dry off the car and then use the airline to remove any water from the edges of the window, before I seal the leaky
bits, as best I can, with black silicone.
Now I need to leave that to dry, and try the compressor test again in a few days. Hopefully, I've at least reduced the leak from a deluge to an
occasional drip.
Yes I know that the only way to fix it properly is to take the window out and refit it with a mew rubber seal. I know that. I also
know that the chances of getting the screen out, and then reinstalling it in one piece without cracking it, are virtually zero, so I'm trying the
easy way first, ok?
:: Sunday, 30 November 2025 ::
Time to check the back window seal - I spray it with soapy water and fire up the compressor again. There are now only 4 tiny leakes, two at the
front driver side, and one on each side above the rear wheels.
I repeat the silicone sealer application in those specific areas, and leave it to dry for a few hours.
 Another soapy water test, and now I only seem to have one leak, halfway back along the nearside bottom edge. I can see where there's a tiny gap in
the sealant, so I have another go at sealing that. I don't think another sear of sealer over the top of what's there, will do the trick, so I dig
out around 6 inches of the sealer I already put in, and replace that whole length.
Another soapy water test, and now I only seem to have one leak, halfway back along the nearside bottom edge. I can see where there's a tiny gap in
the sealant, so I have another go at sealing that. I don't think another sear of sealer over the top of what's there, will do the trick, so I dig
out around 6 inches of the sealer I already put in, and replace that whole length.
Hopefully that will keep the boot dry in any slight shower!
 Then winter blankets on to keep the dust off!